Saxon WordPress Theme Documentation
Theme developed by MagniumThemes
Thank you for your purchase!
To help us release free theme updates with new cool staff and new features please take 1 minute to leave stars rating for this theme on ThemeForest if you like it:
- Go to Themeforest, login and navigate to your account.
- Click Downloads link and you
will see your purchases list:
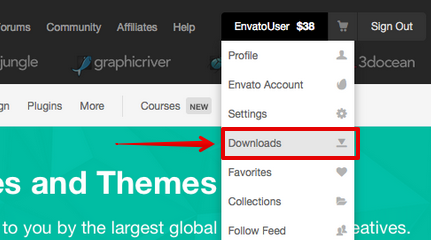
- Click stars around our theme to
leave stars rating:

- Thanks! This little action will help us to release new theme updates and new cool staff for you more frequently and for FREE!
- Please do not leave negative feedback if
you don't like something in our theme or have some
problems.
Contact us instead and we will fix your issue and will help you! We are always welcome for your advices how to improve our theme.
How to install WordPress in 5 minutes #back
to top
How to start your blog in 5 minutes with WordPress.
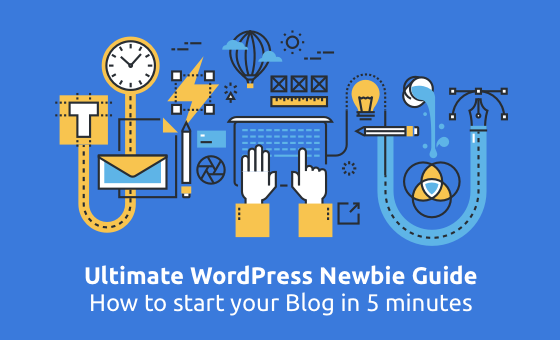
For many, when they think of WordPress, they think “blog.” And while WordPress is one of the world’s largest blogging platforms, WordPress is also a complete content management system and is a great way to build many different types of websites. This article will show you how easy it can be to get your blog, or website, up and running quickly.
You can get FREE WordPress and Theme Installation service for this theme, check here how to apply.
If you want to have additional theme features that
theme does not have by default or want to change
theme styles you can always order our theme customization
services - contact
us.
Hosting recommendation#back
to top
We recommend you to use Bluehost hosting to host your sites based on our themes.
Bluehost WordPress hosting is one of the most popular WordPress hosting trusted by millions of customers all over the world. Founded in 1996, it is reputable and serving for more than 850,000 WordPress websites. Besides, there are many blogs and websites recommend BlueHost WordPress hosting. However, is it really trusted? The answer is definitely YES.
Our company used Bluehost for building sites for our clients for years, this is why we can recommend this beautiful hosting for everyone. Bluehost provide excellent customer support, live chat, and reliability, that every serious product needs. This is “All in one” Unlimited CPanel hosting for very cheap price.
When choosing a right web hosting solution, it’s not the cheaper the better, but the more cost effective the better. BlueHost WordPress is very cost effective. It is starting at $3.49/mo, 50% off the regular price $6.95/mo for customers going through this exclusive promotional link.
Among the hundreds of web hosts we have reviewed, it’s really hard to find one which can offer more features than BlueHost. Taking the price and features into consideration, BlueHost WordPress hosting is the best cheap WordPress hosting.
Still thinking? Check 5 Reasons To Choose BlueHost For WordPress Hosting article on our website.
Get hosting Learn more about BluehostHow to Install Theme #back
to top
If you don't want to install theme yourself you can always order our WordPress and Theme installation service.
Quick installation video guide
Theme installation
Unzip the file that you download after purchase. The following files and folders will be in the unzipped file:
- saxon.zip (Packed theme file for install)
- saxon folder - theme for manual FTP upload
- Documentation/index.html (This file)
- Documentation/release-history.html - Update instructions for theme updates
The theme can be uploaded in two ways:
- FTP upload: Using your FTP program, upload the non-zipped saxon folder into the /wp-content/themes/ folder on your server.
- WordPress upload: Navigate to Appearance > Install Themes > Upload. Go to browse, and select the zipped saxon.zip file. Hit Install Now and the theme will be uploaded and installed.
Once the theme is uploaded, you need to Activate it. Go to Appearance > Themes and activate Saxon theme.
After you Activated this theme you will see Theme Dashboard page that will help you to install and configure theme step by step. First of all you need to activate your theme with your purchase code, then you can install plugins and import demo data.
You can always access Theme Dashboard page again from Appearance > Theme Dashboard.Plugins installation
Go to Appearance > Theme Dashboard and click Install plugins button to see theme bundled plugins available for installation and activation.- Check all required plugins and you can
check recommended plugins (we recommend it to use,
but theme will work without this plugins too):
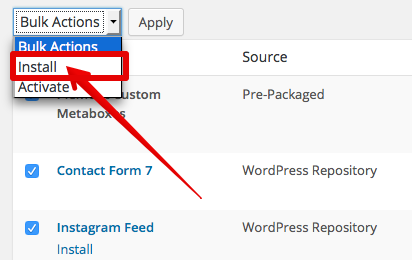
- Select Install in dropdown Bulk Actions menu and click Apply
- You should get All installations have been completed message with installed Plugins table below it.
- If you need Shop Features you can install WooCommerce plugin (go to Plugins and search for WooCommerce).
One-Click Demo data import
You can import all theme demo content with one click (posts, pages, products, categories, menus, sample images, sliders, plugins configurations).
Saxon Theme Addons plugin must be installed and activated.
- Go to Appearance > Import Demo Data.
- Select theme demo that you want to import.
- Click Import Demo Data button and wait
until import process will be finished.
Check
this article how to solve demo data import problems.
Please note that theme data does not have real images
from our demo, all demo images will be replaced with sample
solid color background images (you don't have legal rights to
use real images, because you don't purchased it). You need to
change demo images to your own real images.
Theme settings #back to
top
You can manage all theme settings with Live Preview in WordPress Customizer - go to Appearance > Customizer > Theme Settings or Appearance > Theme Settings to access all theme settings sections.
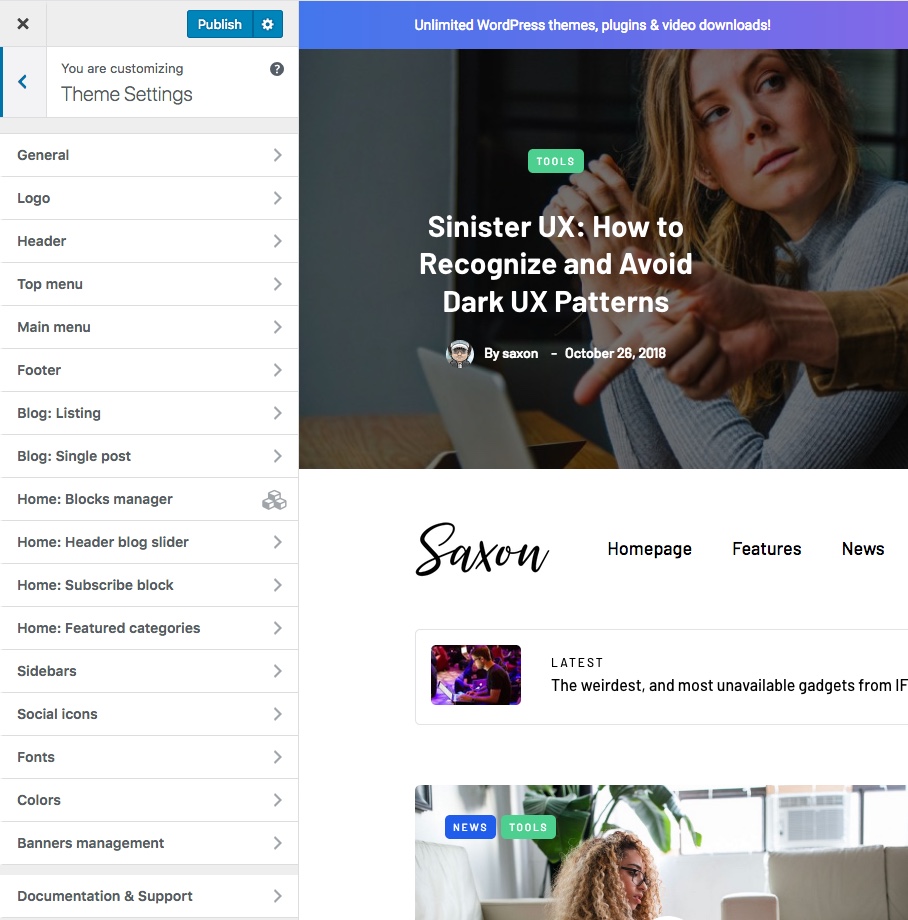
We will not cover all options sections in this Documentation because most of all options are very intuitive and Live Preview in Customizer allow you to see how all options works and which site parts affects in real time.
Just try to use all options and play with it - do not worry, options does not apply if you don't click Publish in Customizer, so you will not break anything.
You can always create Customizer options backup using Customizer Export/Import plugin and Import it later in case you break something.
Logo setup #back to top
To add your logo to theme follow steps below.
- Go to Appearance > Theme Settings > Logo.
- If you want to show Retina logo (high resolution logo for retina devices like iPhone, iPad, MacBook Retina, etc) you need to prepare your logo 2x size larger that original. For example if you want to see logo with 200px width on your site you should make your logo 400px width.
- Select your logo image in Add new image and click Upload.
- You can crop logo image if you want.
- Upload Light logo for using with Transparent header (this should be the same logo with the same size as your regular logo, but in white/light colors, because it will be used on dark semitransparent backgrounds).
- Click Save Changes.
- Go to Appearance > Theme Settings > Logo
and input your regular Logo image width:
If you have big logo you can adjust Header height value in Appearance > Theme Settings > Header. - Click Save Settings.
![]()
Using dark theme #back
to top
Our theme allow you to create dark/black website - with dark background, and light text colors.
How to create dark website:
- Go to Appearance > Theme Settings > Colors and enable Dark theme option checkbox (this will enable light text colors and borders everywhere).
- Specify your own Custom Colors Appearance > Theme Settings > Colors for your dark website (dark backgrounds colors, light text and links colors) OR you can select predefined "Dark" color skin.
- Go to Appearance > Theme Settings > Header and select dark Header background color / image.
- Go to Appearance > Theme Settings > General and select dark Body background color / image.
- Go to Appearance > Logo and upload Logo for Transparent header (Light logo) - it will be used for dark website.
- Go to Appearance > Theme Settings > Top Menu and enable Dark Top menu style if you use Top menu.
- Go to Appearance > Theme Settings > Footer and enable Dark Footer style.
- If you use third party plugins that add custom elements, shortcodes or widgets you may need to add some Custom CSS to restyle this custom elements manually for usage on dark backgrounds.
- AMP website version works separately from theme and will not use dark theme.
Homepage setup#back to
top
This theme allow you to have two types of homepage:
1) Blog page is your homepage - with theme
blocks (and optional blog block).
You will not have additional separate blog
page with just posts listing.
2) Homepage is a special static page -
with theme blocks (and optional blog block).
You can have additional separate blog page
with just posts listing, without theme blocks.
How to configure Blog page as homepage:
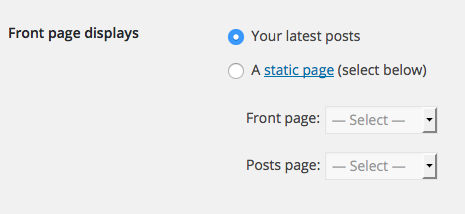
- Go to Settings > Reading
- Make sure that you have Your latest posts
option selected for Front page displays
(you will see your blog on homepage):
- Adjust how many posts you want to show on homepage:

- Click Save settings.
How to configure Static page as homepage:
- Go to Pages > Add new and create
new empty page with name "Home".
Select "Homepage" template for this page in "Page attributes" section:
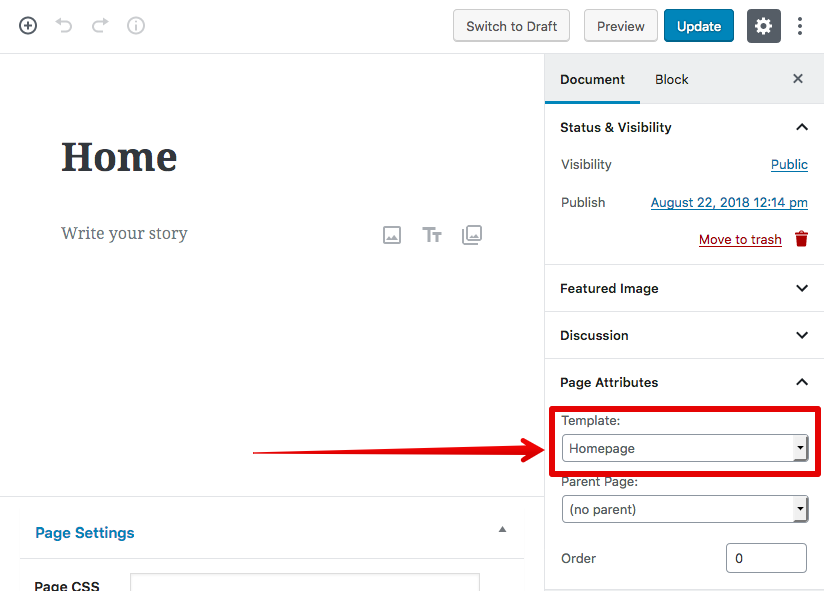
Do not change other page settings - it will not be applied to this special system page. - Go to Pages > Add new and create new empty page with name "Blog".
- Go to Settings > Reading
- Select your Home page as Front
page and your Blog page as Posts
page.
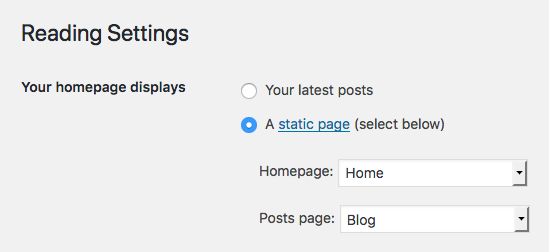
- Adjust how many posts you want to show on blog page:
- Click Save settings.
Check next documentation section to understand how to build your homepage with homepage theme blocks.
Homepage theme blocks #back
to top
In this theme you can build your homepage using homepage theme blocks that you can drag and drop to your homepage with any order and you can have multiple copies of same theme blocks with different settings. Blog listing with optional sidebar is a theme homepage block too and you may not add it to your homepage if you don't need to do this.
Theme Blocks Manager
You need to use theme Blocks manager in
Customizer to add blocks to your homepage.
Go to Appearance > Theme Settings > Home:
Blocks Manager.
Here you can manage your homepage layout settings - add and order blocks. When you add new block you can configure its options depending on block type (displayed in [ ] brackets near block name). You need to ignore options that does not related to block that you want to add.
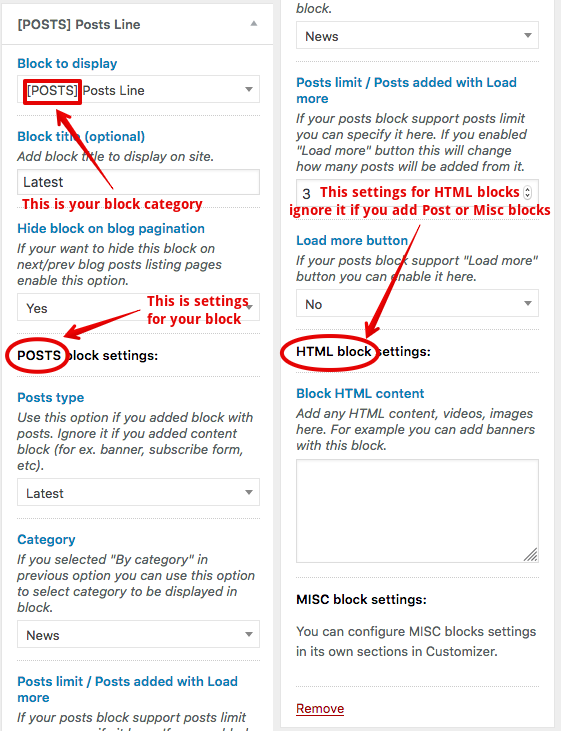
For example If you want to add [POSTS] Posts Line block you need to configure only options in POSTS block settings section. Ignore other sections with options, because it does not related to your block.
Blocks with [MISC] category can be configured independently in its own sections in Appearance > Theme Settings.
Common Blocks settings:
All homepage blocks have common settings that you can use for any block:
- Block title (optional) - displayed before block content. Leave it empty to show just block content.
- Hide block on blog pagination - if you add BLOG block to your homepage you can use this option to hide some of your blocks when user visit 2nd and other Blog pages for navigation between your posts pages in Blog. This is useful if you have a lot of theme blocks above your Blog block on homepage - user will not be need to scroll all this blocks to see next block page posts.
Next you can read about all available theme blocks and settings that this blocks support. Ignore settings that don't supported by this blocks - this settings values will not be applied.
Header Blog Slider
This homepage block located in site header (between top and main menu), you does not need to add it from Homepage Blocks Manager. You can show this block only on homepage or all site pages. You can select posts to be displayed in this slider in its settings.
Header Blog Slider settings can be configured in separate theme settings section: Appearance > Theme settings > Home: Header blog slider.
Header Top Line
This homepage block located in site header (above top menu or header), you does not need to add it from Homepage Blocks Manager. This block displayed on all pages, you can add text, button and custom gradient background to this block.

Header Top Line settings can be configured in header theme settings section: Appearance > Theme settings > Header.
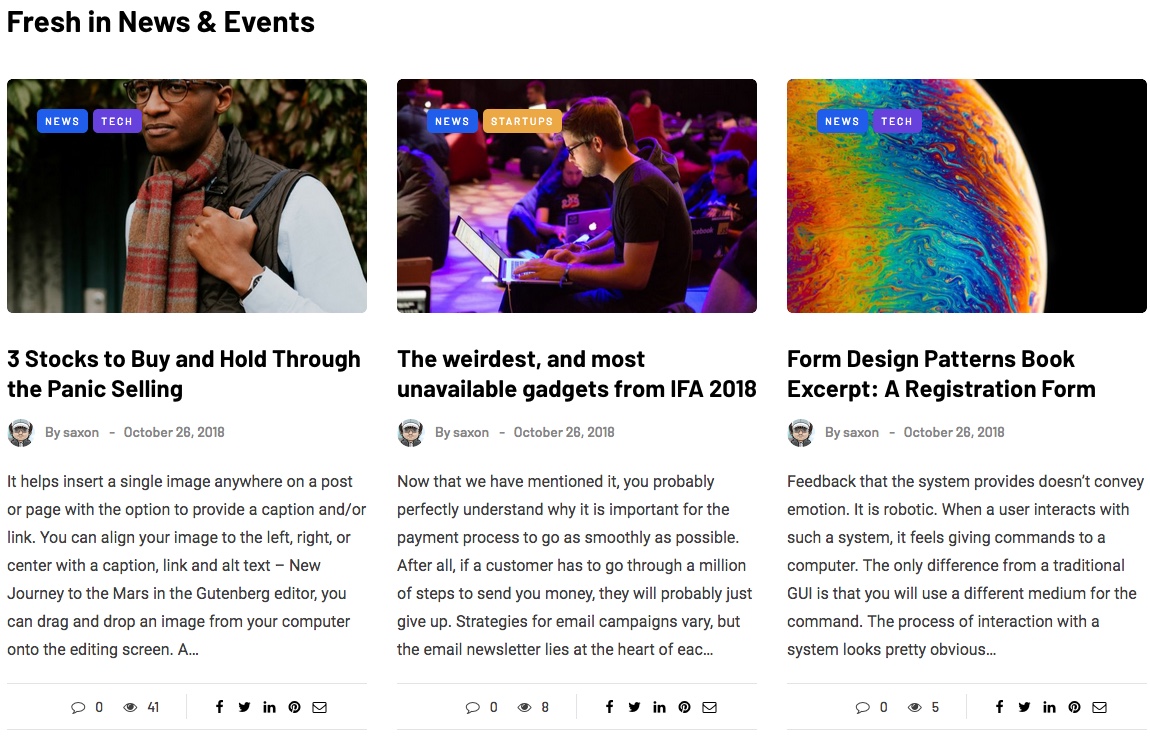
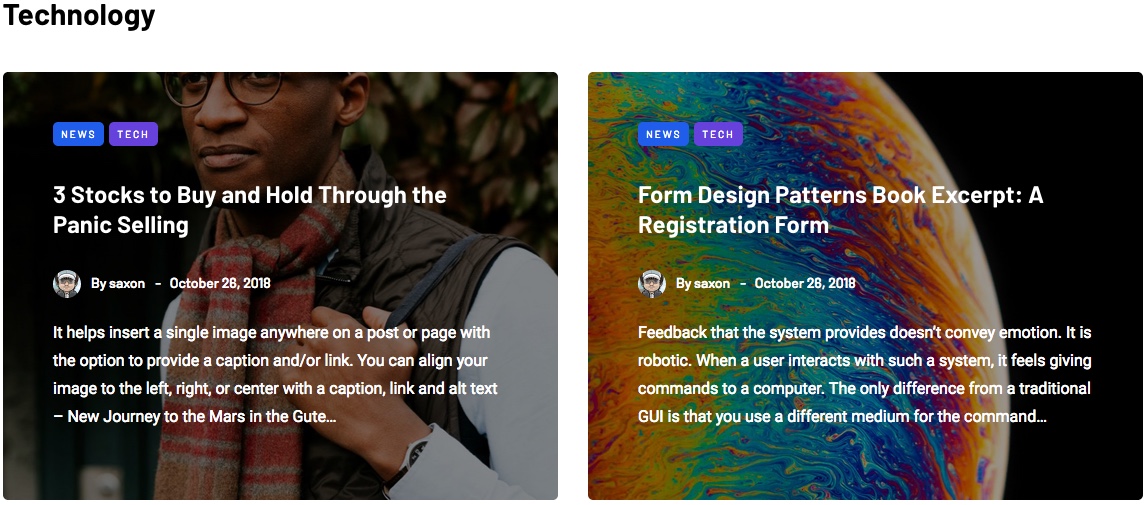
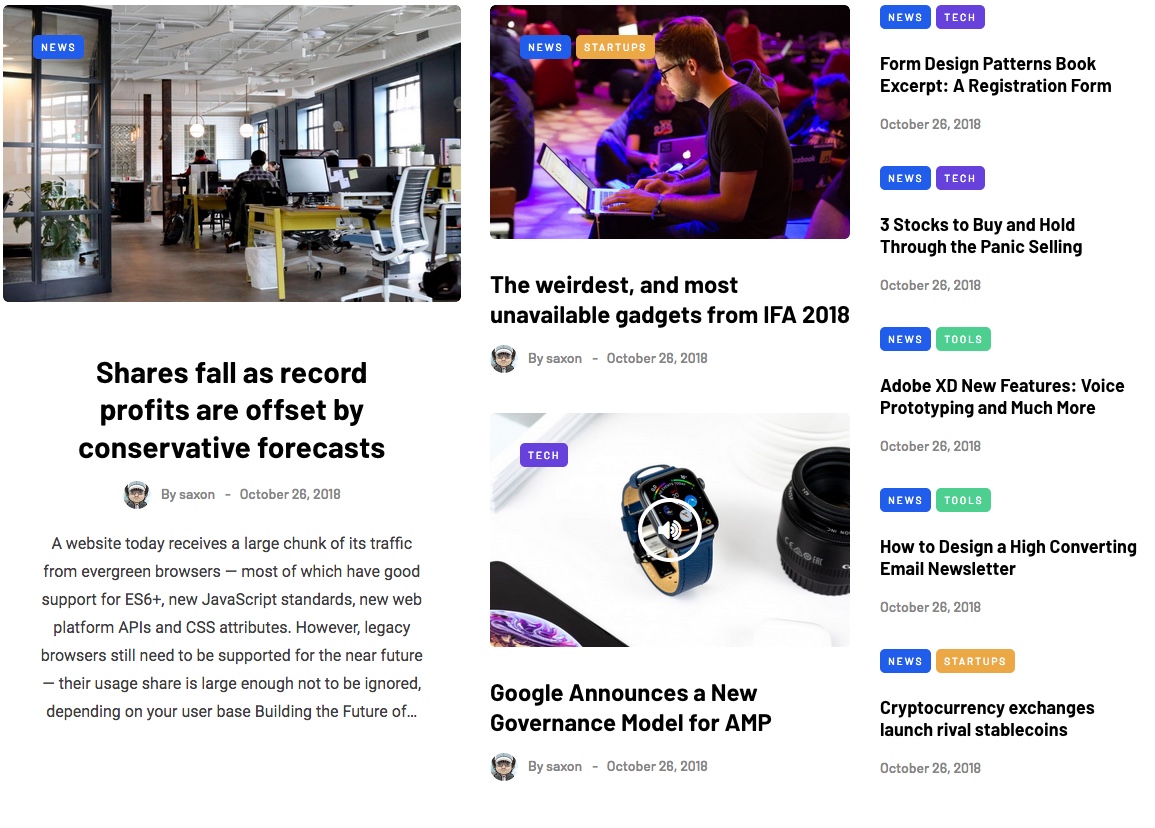
[MISC] Blog Listing
This homepage block used to show your entire blog listing (like on regular Blog page). It support pagination and use optional Blog sidebar (left or right) for your widgets. If you want to have simple blog you can use just this single block on your homepage to have just Blog listing.
Important Note: When you just installed theme (and does not imported demo data) you will have this block added to homepage by default with default settings. When you add any other homepage blocks to your homepage this sample block will be removed and you will need to add it yourself with your own settings from Theme Blocks Manager to desired position on your homepage.
Block settings:
- Load more button - you can use Load more button option from "Posts block settings" section for this block to have Ajax load more posts loading instead of regular WordPress posts pagination.
Please note that other block settings (Posts offset, Posts limit, Category, etc) that you can see in Customizer does not available for Blog Listing block.
All other Blog
listing block settings (Blog layouts, features, etc) can
be configured in separate theme settings section - Appearance
> Theme settings > Blog: Listing. This
settings also applies to Archives and Search
pages on your blog.
You can exclude some
categories from Blog: Listing block display in Appearance
> Theme settings > Blog: Listing
if you already show it in other homepage blocks.
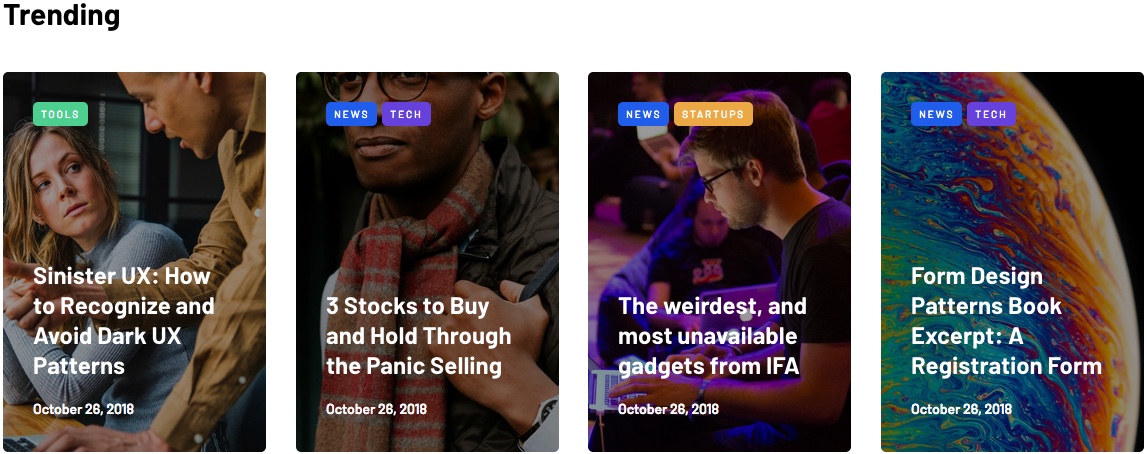
[POSTS] Posts Line #1
This homepage block used to show your selected posts as mini posts slider line with autoplay.
 Block settings:
- Posts type - select posts type to be displayed in this block. You can assign your posts to various posts types (Editor's picks, Promoted, Featured, etc) when you add/edit your post in Posts Settings metabox. Popular posts will show your most viewed posts.
- Category
- you can
use this option to limit your posts by category in
addition to post type.
- Posts limit - number of posts that will be displayed in this block.
- Load more button - this option does not available for this block.
- Posts
offset - number of first posts to skip in
posts query for this block. Offset option will disable
Load More button (this features does not available
together).
[POSTS] Posts Line #2
This homepage block used to show your selected posts as mini posts slider line with 3 posts per row with autoplay.
 Block settings:
- Posts type - select posts type to be displayed in this block. You can assign your posts to various posts types (Editor's picks, Promoted, Featured, etc) when you add/edit your post in Posts Settings metabox. Popular posts will show your most viewed posts.
- Category
- you can
use this option to limit your posts by category in
addition to post type.
- Posts limit - number of posts that will be displayed in this block.
- Load more button - this option does not available for this block.
- Posts offset - number of first posts to skip in posts query for this block. Offset option will disable Load More button (this features does not available together).
[POSTS] Fullwidth Posts Slider
This homepage block used to show your selected posts as fullwidth posts slider with autoplay.
 Block
settings:
Block
settings:
- Posts type - select posts type to be displayed in this block. You can assign your posts to various posts types (Editor's picks, Promoted, Featured, etc) when you add/edit your post in Posts Settings metabox. Popular posts will show your most viewed posts.
- Category - you can use this option to limit your posts by category in addition to post type.
- Posts limit - number of posts that will be displayed in this block.
- Load more button - this option does not available for this block.
- Posts offset - number of first posts to skip in posts query for this block. Offset option will disable Load More button (this features does not available together).
[POSTS] Posts Carousel
This homepage block used to show your selected posts as 4 posts per row posts carousel with autoplay.
 Block settings:
- Posts type - select posts type to be displayed in this block. You can assign your posts to various posts types (Editor's picks, Promoted, Featured, etc) when you add/edit your post in Posts Settings metabox. Popular posts will show your most viewed posts.
- Category - you can use this option to limit your posts by category in addition to post type.
- Posts limit - number of posts that will be displayed in this block.
- Load more button - this option does not available for this block.
- Posts offset - number of first posts to skip in posts query for this block. Offset option will disable Load More button (this features does not available together).
[POSTS] Large Posts Slider
This homepage block used to show your selected posts as large posts slider with autoplay.
 Block
settings:
Block
settings:
- Posts type - select posts type to be displayed in this block. You can assign your posts to various posts types (Editor's picks, Promoted, Featured), etc when you add/edit your post in Posts Settings metabox. Popular posts will show your most viewed posts.
- Category - you can use this option to limit your posts by category in addition to post type.
- Posts limit - number of posts that will be displayed in this block.
- Load more button - this option does not available for this block.
- Posts offset - number of first posts to skip in posts query for this block. Offset option will disable Load More button (this features does not available together).
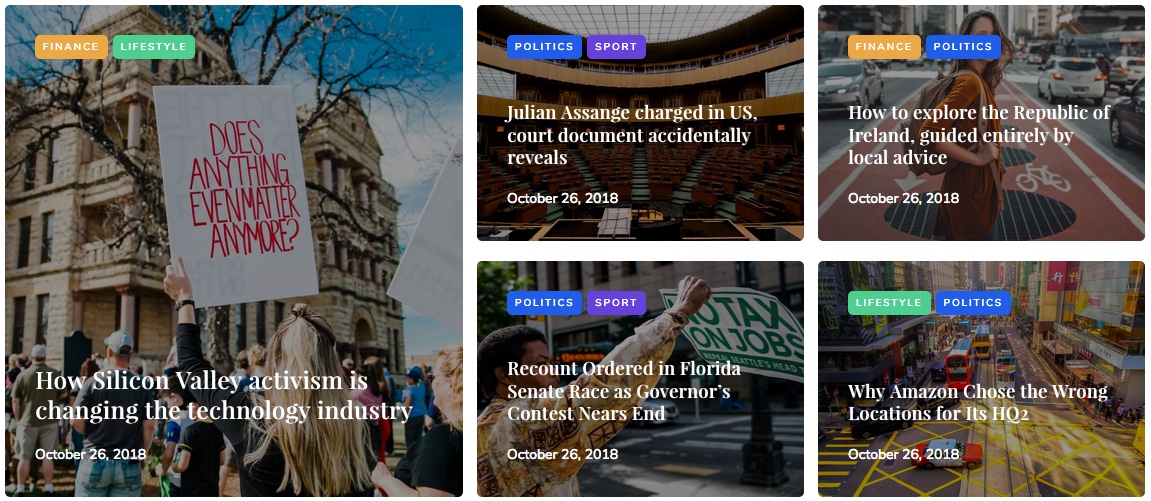
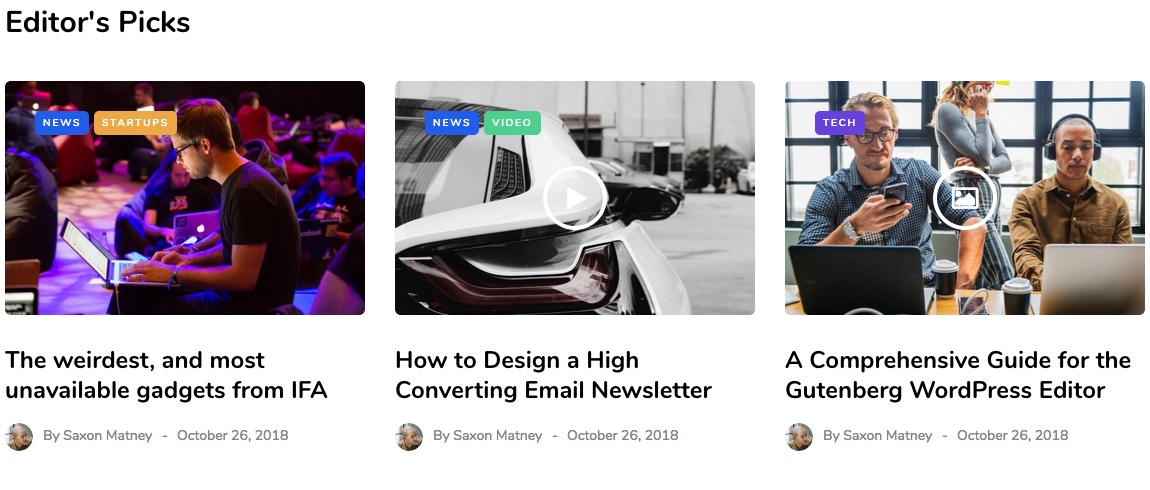
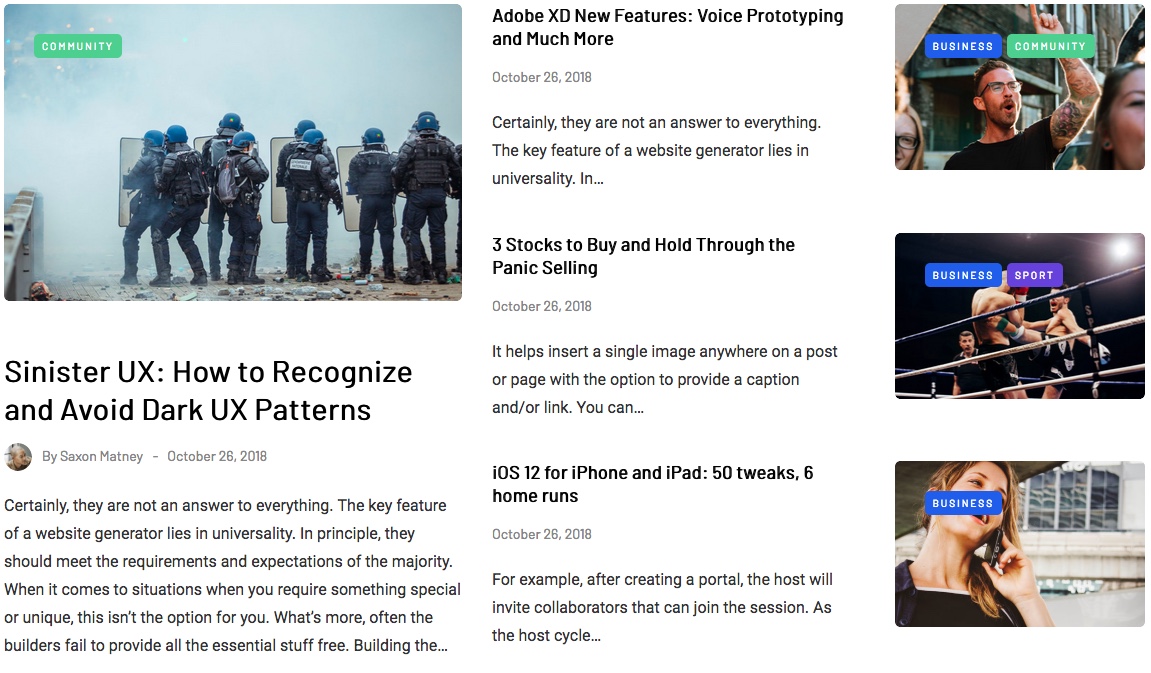
[POSTS] Posts Showcase 1
This homepage block used to show your selected posts as special showcase grid with 5 posts.
 Block settings:
- Posts type - select posts type to be displayed in this block. You can assign your posts to various posts types (Editor's picks, Promoted, Featured, etc) when you add/edit your post in Posts Settings metabox. Popular posts will show your most viewed posts.
- Category - you can use this option to limit your posts by category in addition to post type.
- Posts limit - this option does not available for this block (this block have predefined 5 posts limit).
- Load more button - this option does not available for this block.
- Posts offset - number of first posts to skip in posts query for this block. Offset option will disable Load More button (this features does not available together).
[POSTS] Posts Showcase 2
This homepage block used to show your selected posts as special showcase grid with 4 posts.
 Block settings:
- Posts type - select posts type to be displayed in this block. You can assign your posts to various posts types (Editor's picks, Promoted, Featured, etc) when you add/edit your post in Posts Settings metabox. Popular posts will show your most viewed posts.
- Category - you can use this option to limit your posts by category in addition to post type.
- Posts limit - this option does not available for this block (this block have predefined 4 posts limit).
- Load more button - this option does not available for this block.
- Posts offset - number of first posts to skip in posts query for this block. Offset option will disable Load More button (this features does not available together).
[POSTS] Posts Showcase 3
This homepage block used to show your selected posts as special showcase grid with 3 posts.
 Block settings:
- Posts type - select posts type to be displayed in this block. You can assign your posts to various posts types (Editor's picks, Promoted, Featured, etc) when you add/edit your post in Posts Settings metabox. Popular posts will show your most viewed posts.
- Category - you can use this option to limit your posts by category in addition to post type.
- Posts limit - this option does not available for this block (this block have predefined 4 posts limit).
- Load more button - this option does not available for this block.
- Posts offset - number of first posts to skip in posts query for this block. Offset option will disable Load More button (this features does not available together).
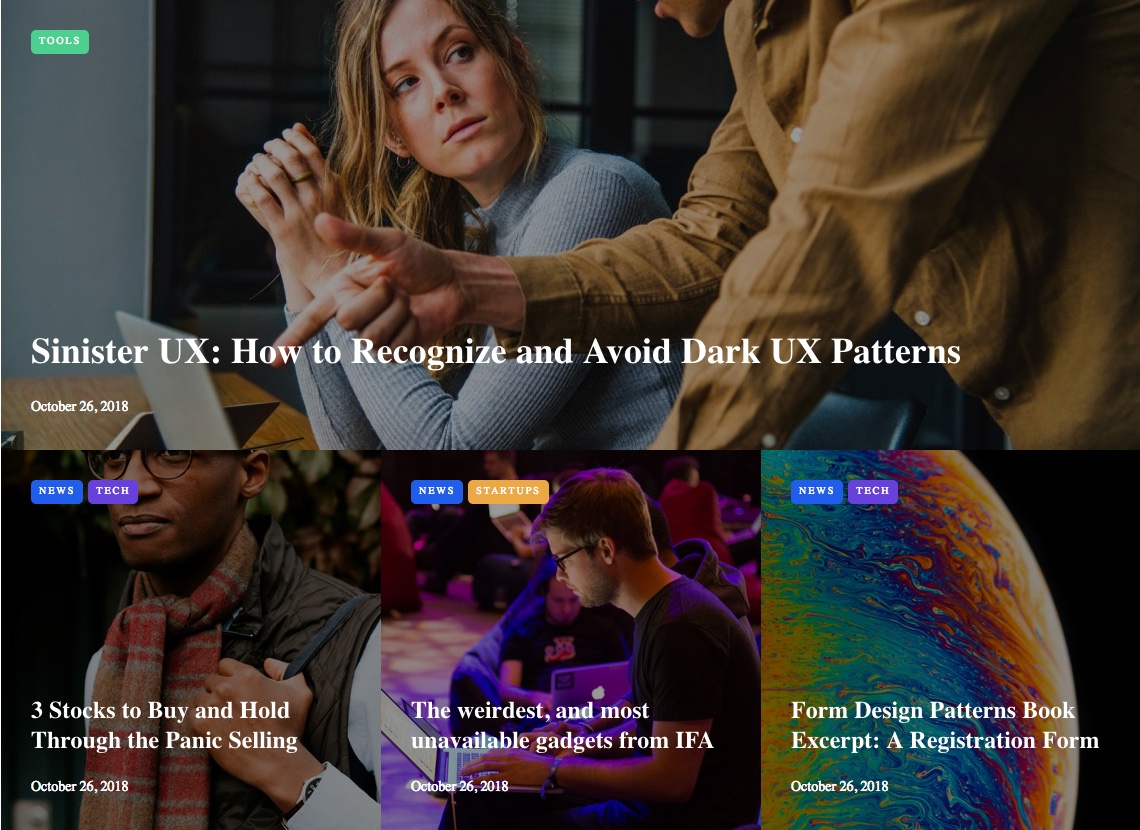
[POSTS] Posts Showcase 4
This homepage block used to show your selected posts as special showcase grid with 4 posts.
 Block settings:
- Posts type - select posts type to be displayed in this block. You can assign your posts to various posts types (Editor's picks, Promoted, Featured, etc) when you add/edit your post in Posts Settings metabox. Popular posts will show your most viewed posts.
- Category - you can use this option to limit your posts by category in addition to post type.
- Posts limit - this option does not available for this block (this block have predefined 4 posts limit).
- Load more button - this option does not available for this block.
- Posts offset - number of first posts to skip in posts query for this block. Offset option will disable Load More button (this features does not available together).
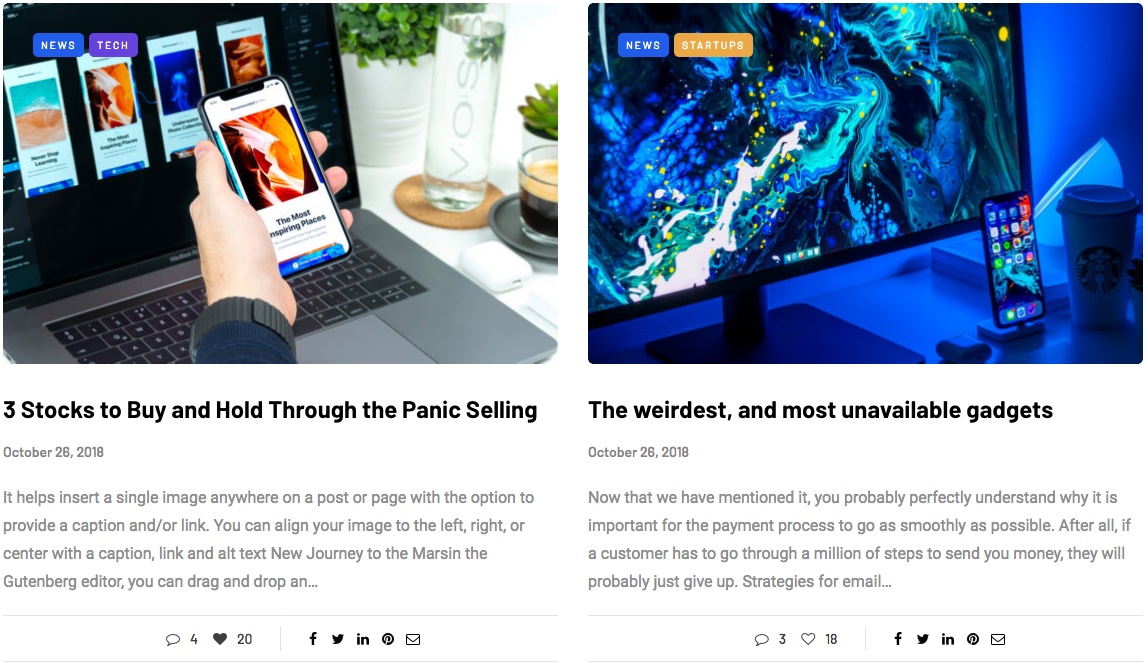
[POSTS] Posts Grid #1
This homepage block used to show your selected posts as grid with 3 columns and additional info in posts (comments, views, social share buttons).
 Block settings:
- Posts type - select posts type to be displayed in this block. You can assign your posts to various posts types (Editor's picks, Promoted, Featured, etc) when you add/edit your post in Posts Settings metabox. Popular posts will show your most viewed posts.
- Category - you can use this option to limit your posts by category in addition to post type.
- Posts limit - number of posts that will be displayed in this block.
- Load more button - use this option to add Load more button that will load next portion of posts (the same as Posts limit option defined for block) via Ajax.
- Posts offset - number of first posts to skip in posts query for this block. Offset option will disable Load More button (this features does not available together).
[POSTS] Posts Grid #2
This homepage block used to show your selected posts as grid with 2 columns and overlay for posts.
 Block settings:
- Posts type - select posts type to be displayed in this block. You can assign your posts to various posts types (Editor's picks, Promoted, Featured, etc) when you add/edit your post in Posts Settings metabox. Popular posts will show your most viewed posts.
- Category - you can use this option to limit your posts by category in addition to post type.
- Posts limit - number of posts that will be displayed in this block.
- Load more button - use this option to add Load more button that will load next portion of posts (the same as Posts limit option defined for block) via Ajax
- Posts offset - number of first posts to skip in posts query for this block. Offset option will disable Load More button (this features does not available together).
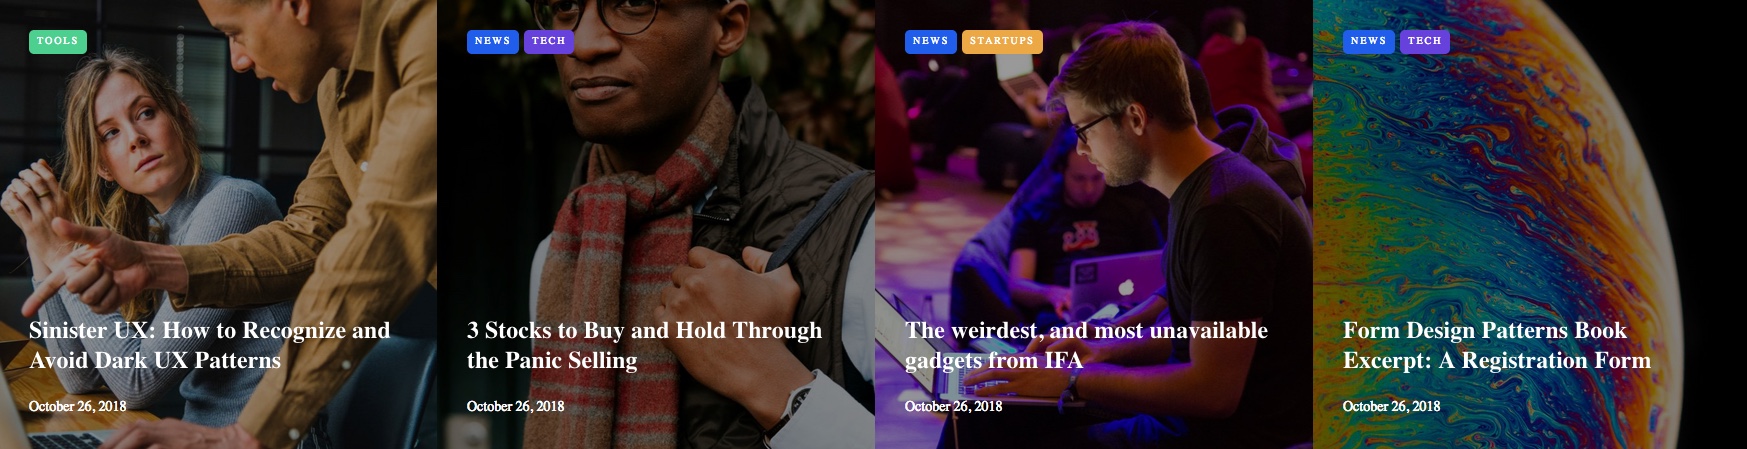
[POSTS] Posts Grid #3
This homepage block used to show your selected posts as grid with 4 columns and overlay for posts.
 Block settings:
- Posts type - select posts type to be displayed in this block. You can assign your posts to various posts types (Editor's picks, Promoted, Featured, etc) when you add/edit your post in Posts Settings metabox. Popular posts will show your most viewed posts.
- Category - you can use this option to limit your posts by category in addition to post type.
- Posts limit - number of posts that will be displayed in this block.
- Load more button - use this option to add Load more button that will load next portion of posts (the same as Posts limit option defined for block) via Ajax
- Posts offset - number of first posts to skip in posts query for this block. Offset option will disable Load More button (this features does not available together).
[POSTS] Posts Grid #4
This homepage block used to show your selected posts as grid with 3 columns and blocks for posts.
 Block settings:
- Posts type - select posts type to be displayed in this block. You can assign your posts to various posts types (Editor's picks, Promoted, Featured, etc) when you add/edit your post in Posts Settings metabox. Popular posts will show your most viewed posts.
- Category - you can use this option to limit your posts by category in addition to post type.
- Posts limit - number of posts that will be displayed in this block.
- Load more button - use this option to add Load more button that will load next portion of posts (the same as Posts limit option defined for block) via Ajax
- Posts offset - number of first posts to skip in posts query for this block. Offset option will disable Load More button (this features does not available together).
[POSTS] Posts Grid #5
This homepage block used to show your selected posts as grid with 4 columns and blocks for posts without thumbnails.
 Block settings:
- Posts type - select posts type to be displayed in this block. You can assign your posts to various posts types (Editor's picks, Promoted, Featured, etc) when you add/edit your post in Posts Settings metabox. Popular posts will show your most viewed posts.
- Category - you can use this option to limit your posts by category in addition to post type.
- Posts limit - number of posts that will be displayed in this block.
- Load more button - use this option to add Load more button that will load next portion of posts (the same as Posts limit option defined for block) via Ajax
- Posts offset - number of first posts to skip in posts query for this block. Offset option will disable Load More button (this features does not available together).
[POSTS] Posts Grid #6
This homepage block used to show your selected posts as fullwidth grid with 4 columns.
 Block settings:
- Posts type - select posts type to be displayed in this block. You can assign your posts to various posts types (Editor's picks, Promoted, Featured, etc) when you add/edit your post in Posts Settings metabox. Popular posts will show your most viewed posts.
- Category - you can use this option to limit your posts by category in addition to post type.
- Posts limit - number of posts that will be displayed in this block.
- Load more button - use this option to add Load more button that will load next portion of posts (the same as Posts limit option defined for block) via Ajax
- Posts offset - number of first posts to skip in posts query for this block. Offset option will disable Load More button (this features does not available together).
[POSTS] Posts Grid #7
This homepage block used to show your selected posts as small grid with 3 columns.
 Block settings:
- Posts type - select posts type to be displayed in this block. You can assign your posts to various posts types (Editor's picks, Promoted, Featured, etc) when you add/edit your post in Posts Settings metabox. Popular posts will show your most viewed posts.
- Category - you can use this option to limit your posts by category in addition to post type.
- Posts limit - number of posts that will be displayed in this block.
- Load more button - use this option to add Load more button that will load next portion of posts (the same as Posts limit option defined for block) via Ajax
- Posts offset - number of first posts to skip in posts query for this block. Offset option will disable Load More button (this features does not available together).
[POSTS] Posts Grid #8
This homepage block used to show your selected posts as grid with 2 columns and additional info in posts (comments, views, social share buttons).
 Block settings:
- Posts type - select posts type to be displayed in this block. You can assign your posts to various posts types (Editor's picks, Promoted, Featured, etc) when you add/edit your post in Posts Settings metabox. Popular posts will show your most viewed posts.
- Category - you can use this option to limit your posts by category in addition to post type.
- Posts limit - number of posts that will be displayed in this block.
- Load more button - use this option to add Load more button that will load next portion of posts (the same as Posts limit option defined for block) via Ajax
- Posts offset - number of first posts to skip in posts query for this block. Offset option will disable Load More button (this features does not available together).
[POSTS] Posts Masonry #1
This homepage block used to show 3 of your selected posts as complex masonry grid with 2 columns.
 Block settings:
- Posts type - select posts type to be displayed in this block. You can assign your posts to various posts types (Editor's picks, Promoted, Featured, etc) when you add/edit your post in Posts Settings metabox. Popular posts will show your most viewed posts.
- Category - you can use this option to limit your posts by category in addition to post type.
- Posts
limit - this
option does not available for this
block (this block have predefined 3 posts limit).
- Load more button - this option does not available for this block.
- Posts offset - number of first posts to skip in posts query for this block. Offset option will disable Load More button (this features does not available together).
[POSTS] Posts Masonry #2
This homepage block used to show 8 of your selected posts as complex masonry grid with 2 columns.
 Block settings:
- Posts type - select posts type to be displayed in this block. You can assign your posts to various posts types (Editor's picks, Promoted, Featured, etc) when you add/edit your post in Posts Settings metabox. Popular posts will show your most viewed posts.
- Category - you can use this option to limit your posts by category in addition to post type.
- Posts
limit - this
option does not available for this
block (this block have predefined 8 posts limit).
- Load more button - this option does not available for this block.
- Posts offset - number of first posts to skip in posts query for this block. Offset option will disable Load More button (this features does not available together).
[POSTS] Posts Masonry #3
This homepage block used to show 4 of your selected posts as complex masonry grid with 2 columns.
 Block settings:
- Posts type - select posts type to be displayed in this block. You can assign your posts to various posts types (Editor's picks, Promoted, Featured, etc) when you add/edit your post in Posts Settings metabox. Popular posts will show your most viewed posts.
- Category - you can use this option to limit your posts by category in addition to post type.
- Posts
limit - this
option does not available for this
block (this block have predefined 4 posts limit).
- Load more button - this option does not available for this block.
- Posts offset - number of first posts to skip in posts query for this block. Offset option will disable Load More button (this features does not available together).
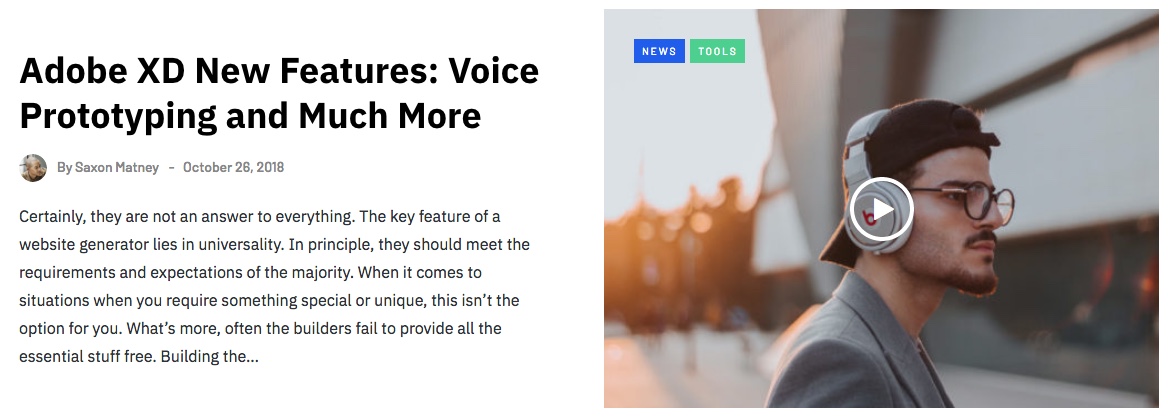
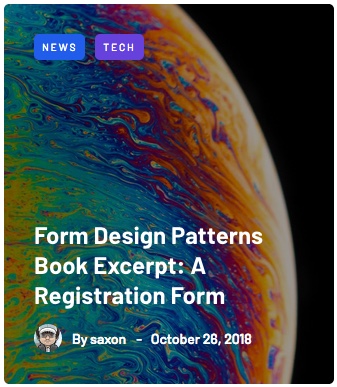
[POSTS] Post Highlight
This homepage block used to show 1 of your selected post as special large post block.
 Block settings:
- Posts type - select posts type to be displayed in this block. You can assign your posts to various posts types (Editor's picks, Promoted, Featured, etc) when you add/edit your post in Posts Settings metabox. Popular posts will show your most viewed posts.
- Category - you can use this option to limit your posts by category in addition to post type.
- Posts
limit - this
option does not available for this
block (this block have predefined 1 post limit).
- Load more button - this option does not available for this block.
- Posts offset - number of first posts to skip in posts query for this block. Offset option will disable Load More button (this features does not available together).
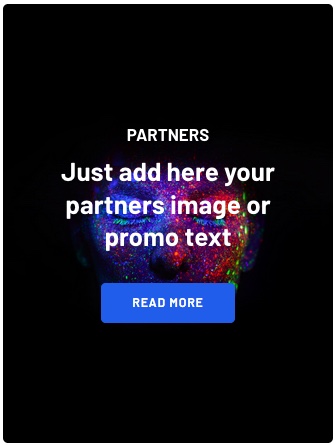
[HTML] HTML Block
This homepage block used to show any HTML or shortcodes on your homepage. For example you can use it to add image banners to your website. Bootstrap 3 layouts supported in this block.
NOTICE: WordPress does not render [embed] shortcodes (used to insert video, audio, etc) in custom areas. If you need to add video or audio embeds to HTML Block you need to add player with <iframe> code that you can get on your video/audio service (for ex. YouTube).

Block settings:
- Block HTML content - add your block content as HTML code. You can use WordPress shortcodes here too.
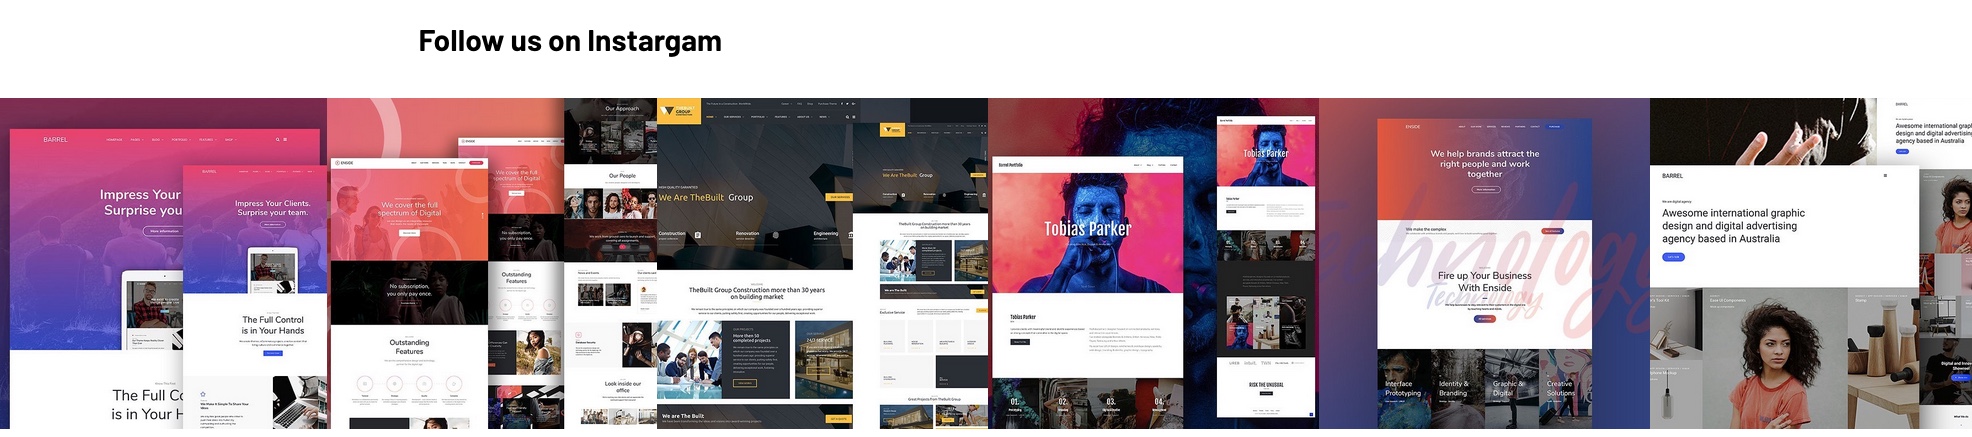
[HTML] Instagram Block
This homepage block used to show fullwidth Instagram gallery from Instagram Feed plugin (provided with theme, plugin must be installed and activated to use this block).
Block settings:
This block settings (you can add your Instagram account, change appearance and design for Instagram feed, etc) can be configured in Instagram Feed plugin settings section - WordPress dashboard > Instagram Feed.Instagram Feed and account configuration:
- Go to Instagram Feed section in left WordPress dashboard menu (plugin should be installed).
- Click Log in button and login to your
Instagram account. You will see your Access token
and User ID after this. Copy
this data to corresponding fields below if it
does not added here automatically.
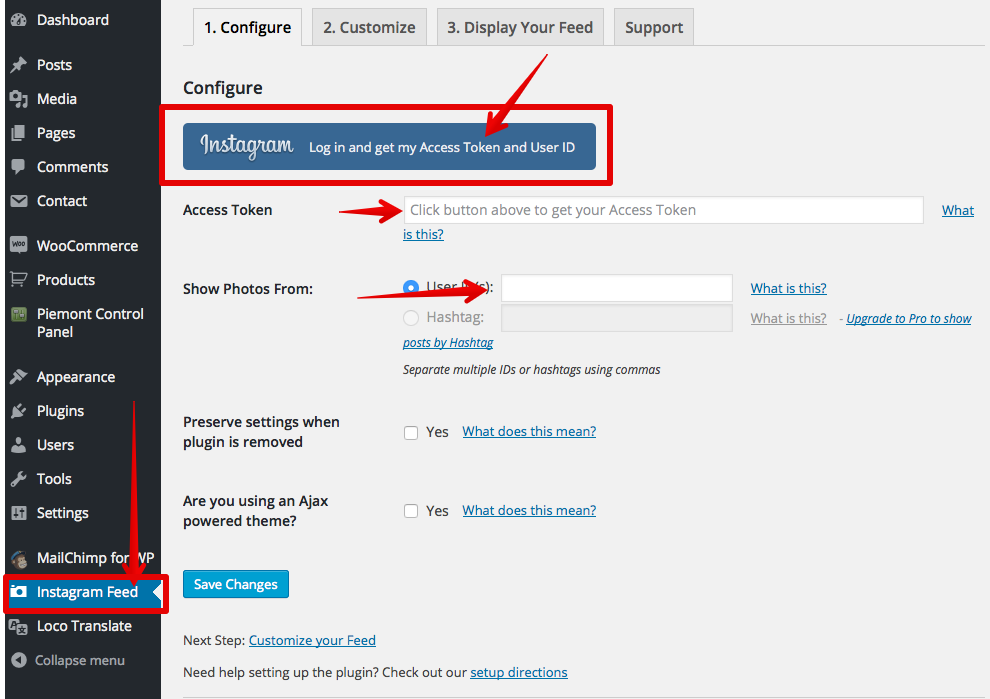
- Save Changes and click Customize tab.
- Set values for options like you see on
screenshot below:
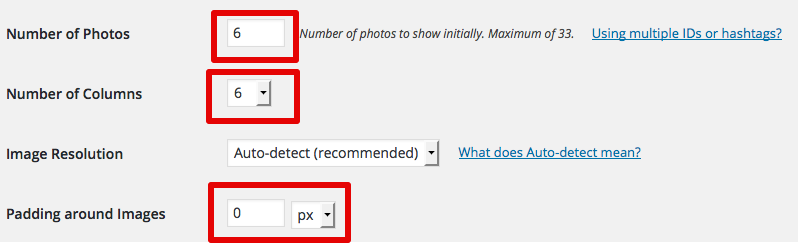

- Save settings.
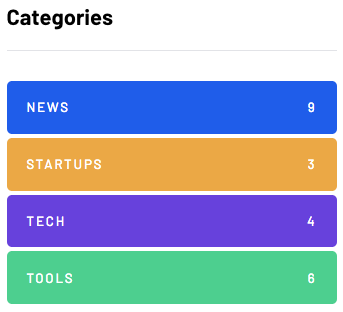
[MISC] Categories Block
This homepage block used to show selected categories with categories images background and colors.
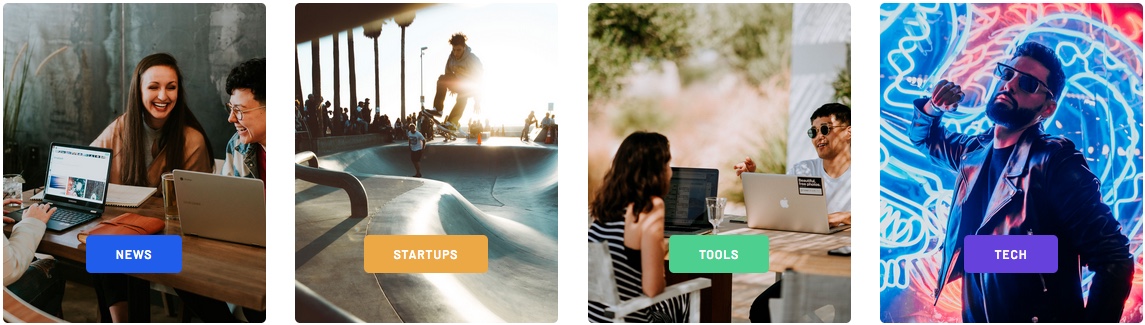
Block settings:
This block settings can be configured in separate theme settings section - Appearance > Theme settings > Home: Featured categories.[MISC] Subscribe Block
This homepage block used to show email subscription form from Mailchimp WP plugin.

Mailchimp form and account configuration:
You need to install Mailchimp for WP plugin (provided with theme) to use this block.
How to configure your Mailchimp subscription form
in WordPress:
- Go to Mailchimp for WP > Mailchimp section in left WordPress admin panel menu (plugin should be installed).
- Add your API key to MailChimp API key
field (use Get your API key here link
to obtain your key).
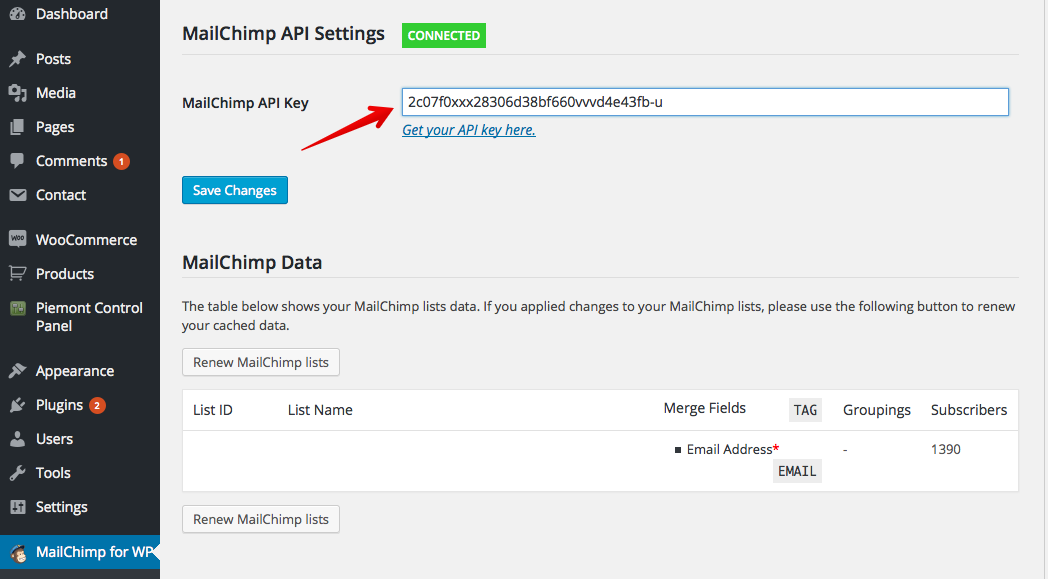
- Save Changes.
- Go to Mailchimp for WP > Forms.
- Check your list for Lists this form subscribes to option to set what list will be used to subscribe your users on MailChimp.
- Copy and paste HTML code below to Form mark-up
field:
<div class="mailchimp-widget-signup-form"><input type="email" name="EMAIL" placeholder="Please enter your e-mail" required /><button type="submit" class="btn">Subscribe</button></div> - Remember your form id:
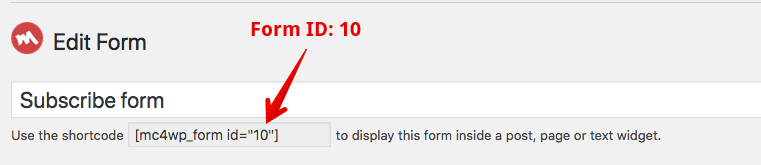
- Save changes.

Block settings:
This block settings can be configured in separate theme settings section - Appearance > Theme settings > Home: Subscribe block:
- Copy and paste HTML code below to Subscribe
block content field in Text (not Visual) tab:
<div class="row">

                        <div class="col-md-12">

                        <h5><strong>Sign up for our Newsletter and
                        <br class="br" />stay
                        informed</strong></h5>

                        [mc4wp_form id="10"]

                        </div>

</div> - Change 10 to your Mailchimp form ID that you remembered before.
- Save settings.
Now you should see your subscribe form when you will add Subscribe homepage block to your homepage.
Footer Shortcode and HTML Blocks
You can show HTML blocks in footer with any shortcodes or content inside it.How to use this:
- Go to Appearance > Theme Settings > Footer and use Footer HTML block and Footer Shortcode block settings to add your custom content in footer.
- Click Publish to save Customizer settings.
Posts management #back
to top
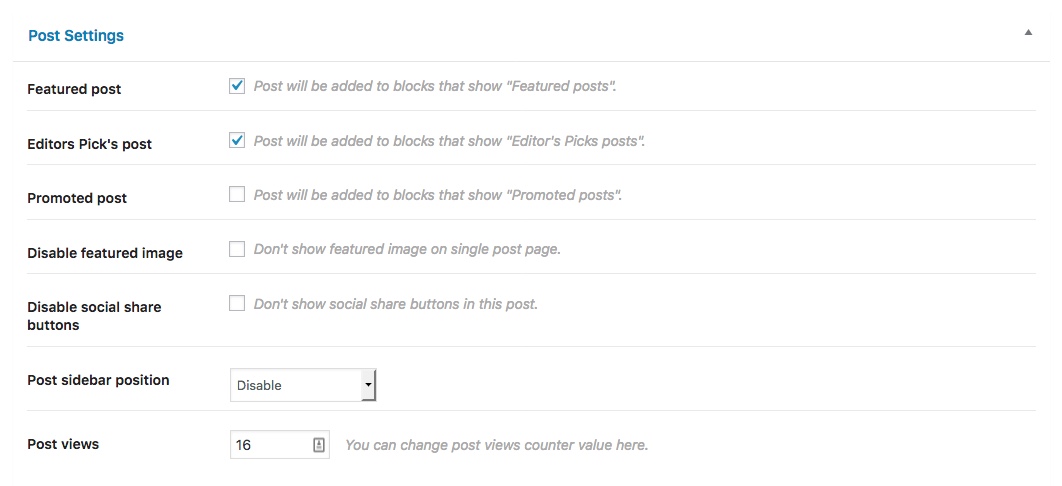
Post settings
You can select different sidebar position for posts and assign post to different sections used in your Homepage Blocks in Post settings metabox.
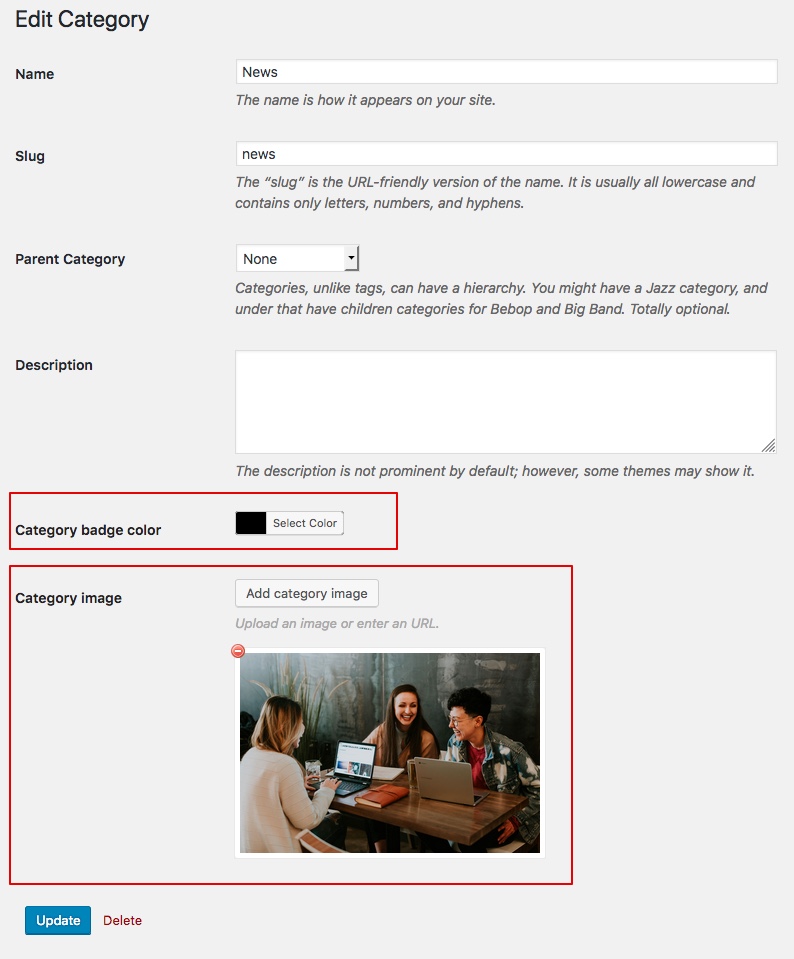
Post categories
In this theme you can assign images and colors for your Posts categories. Categories images used on Categories (Archives) pages for category title display and Categories homepage block. Categories colors used everywhere on site for categories badges in posts.

To assign color and image for category add or edit your category and use special options for this:
WordPress Tiled Galleries
If you want to add WordPress Tiled galleries in your posts for images you can install JetPack plugin and enable its tiled galleries feature. After this you will have new options for gallery style when you add regular image gallery to your post content.
Managing Excerpt for posts (short post content)
You need to divide your articles short content from full content to show your posts with "Continue reading" button on blog listing pages (your homepage for example) or you will see full articles. Check this WordPress guide how to use More WordPress tag in your posts to use this feature.
Also you can show posts excerpts with automatic text cut and Continue reading buttons. To enable this feature go to Appearance > Theme Settings > Blog: Listing and choose excerpt for Blog posts short content display option.
Please note that some homepage blocks with posts have predefined excerpts lengths that you can't change.
Disable featured image on Single post page
You can disable featured post image in your posts single page (you will still have it in blog post listings):
- If you want to disable featured image on single post page for all posts in your blog go to Appearance > Theme Settings > Blog single post and disable Featured image option.
- If you want to disable image on single blog page for
some blog posts only you need to edit your post and
enable Don't show featured image on single post
page option in Post Settings.
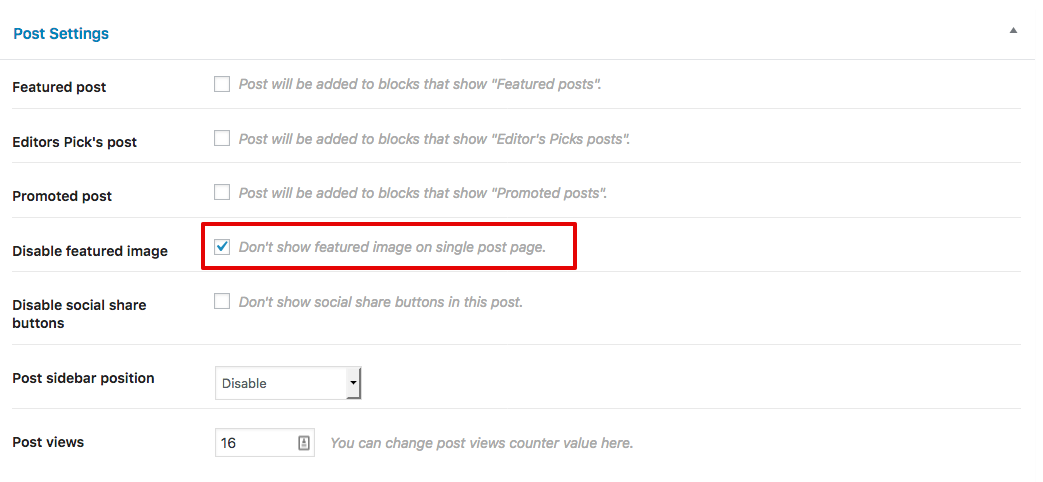
- Save your post.
Header image for Single post page
You can show header with custom background image for your
posts (different image for different posts).
How to use this feature:
- Edit your post and upload your image in
Header Background section in post
settings:
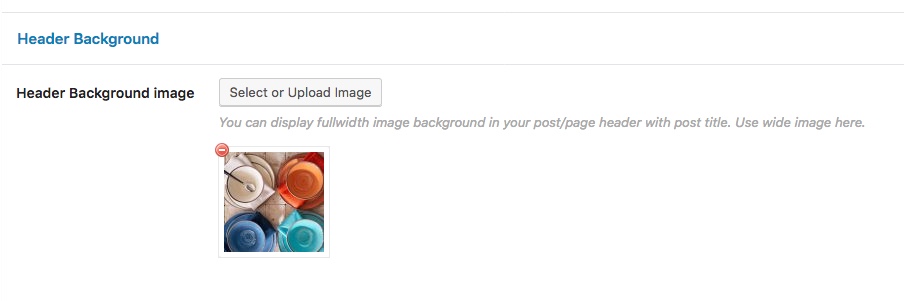
- We recommend to use wide image in good resolution for nice cover display (1600px wide or more).
- Save your post.
- You can enable Transparent header feature
for posts and pages with Header Background image
in Appearance > Theme Settings > Blog:
Single post:
Related posts
You can display related posts (by tags or categories - you
can change this in Theme settings) for all
your posts in some blog layouts.
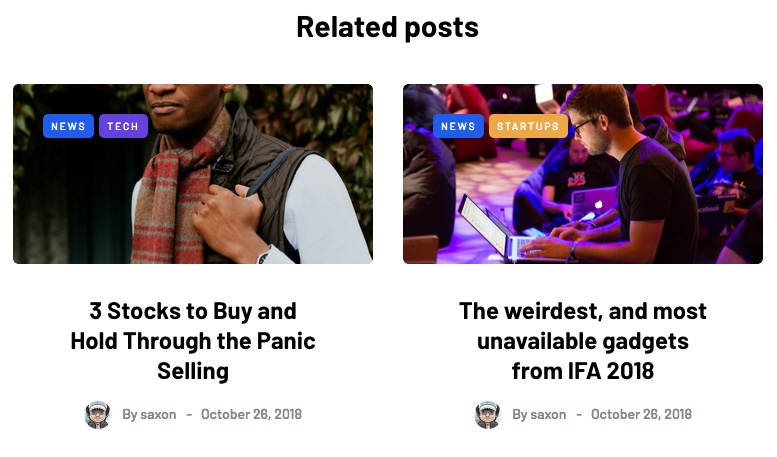
To Enable this feature:
- Assign the same tags for some of your posts (related posts feature works by tags or categories). Posts with the same tag will be related to each other.
- Go to Appearance > Theme Settings > Blog
listing or Blog single post
and enable Related posts display.
- Click Publish to save Customizer settings.
Post Views and Likes
You can display post Views and post Likes on Single blog post page and in some of Homepage blocks and Blog listing layouts.

- Post Views - show number of total visits to your post (this is not a unique visitors like in Google Analytic - this is number of total views for your post).
- Post Likes - show how many times unique site visitors liked your post (Clicked heart icon in post. One user can like same post only once).
You can enable post likes and post views counters display in Theme Settings > Blog: Listing and Theme Settings > Blog: Single post, separately for single post page and blocks/blog listing.
You can filter posts by "Most liked" in Homepage Theme
Blocks and Saxon List Post widget.
Featured post (Sticky post)
You can display some of your posts (important posts) always
at first position in blog listing and mark this as featured
post. In different blog styles and layouts this "mark" can
look different.
How to display your post as featured:
- Edit your post in Posts.
- In Publish section check Stick
to the Front Page option. If you use Masonry
layout for your blog you should add Featured
image for this post (because it will be used as
background for featured post).
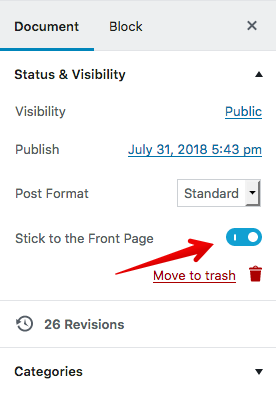
- Save your post.
Worth reading post
In addition to Related Post that works automatically you
can also manually select special posts ("Worth Reading"
posts) that will be assigned to your post and displayed in
nice fixed popup in the right bottom side of your Single
Blog Post page. This block will show one from assigned posts
randomly.
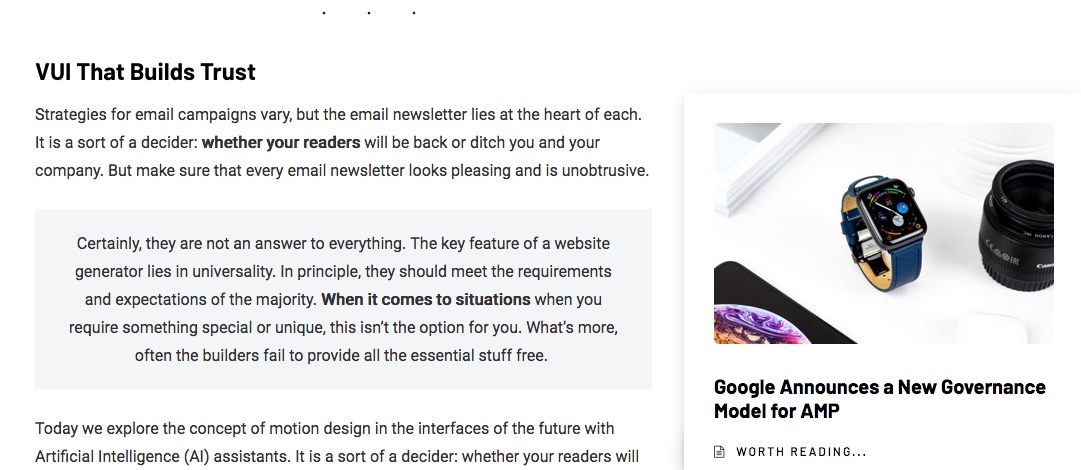
How to use this feature:
- Go to Appearance > Theme settings > Blog: Single post and enable Worth reading post feature.
- Edit your Post(s) and assign
Worth reading posts to each post where you want
to see it in Post settings:
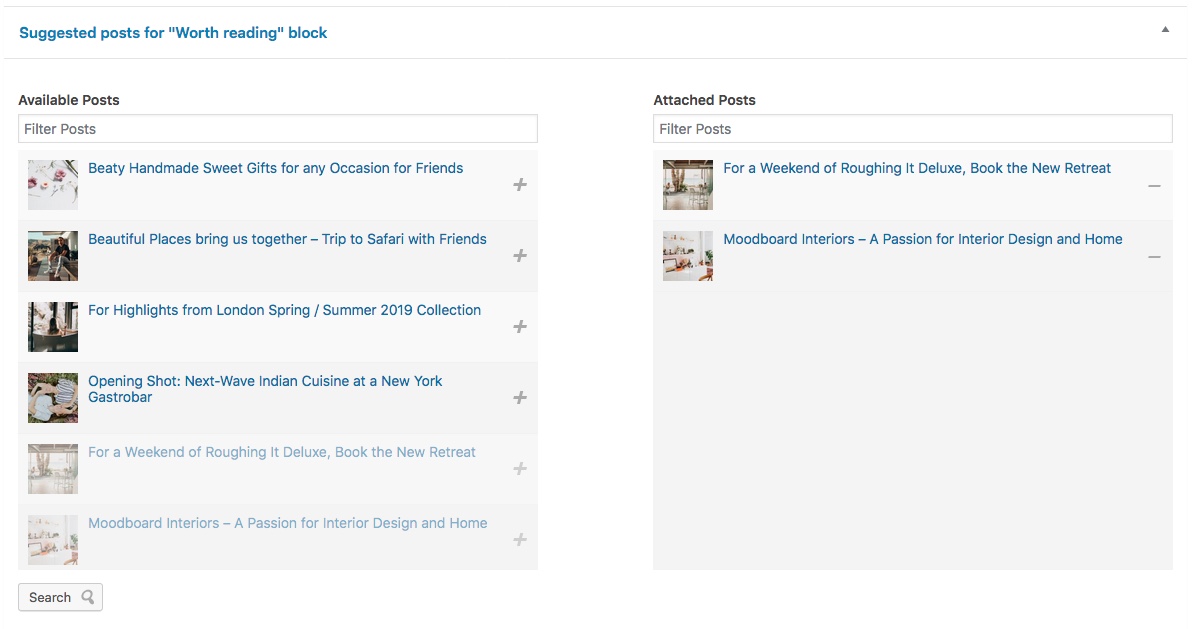
- Save post.
Reading progress bar in Single post
You can display reading progress bar in your single post
pages for your visitors. When user will scroll post page
this progress bar will show current reading progress of
entire post content in fixed header.
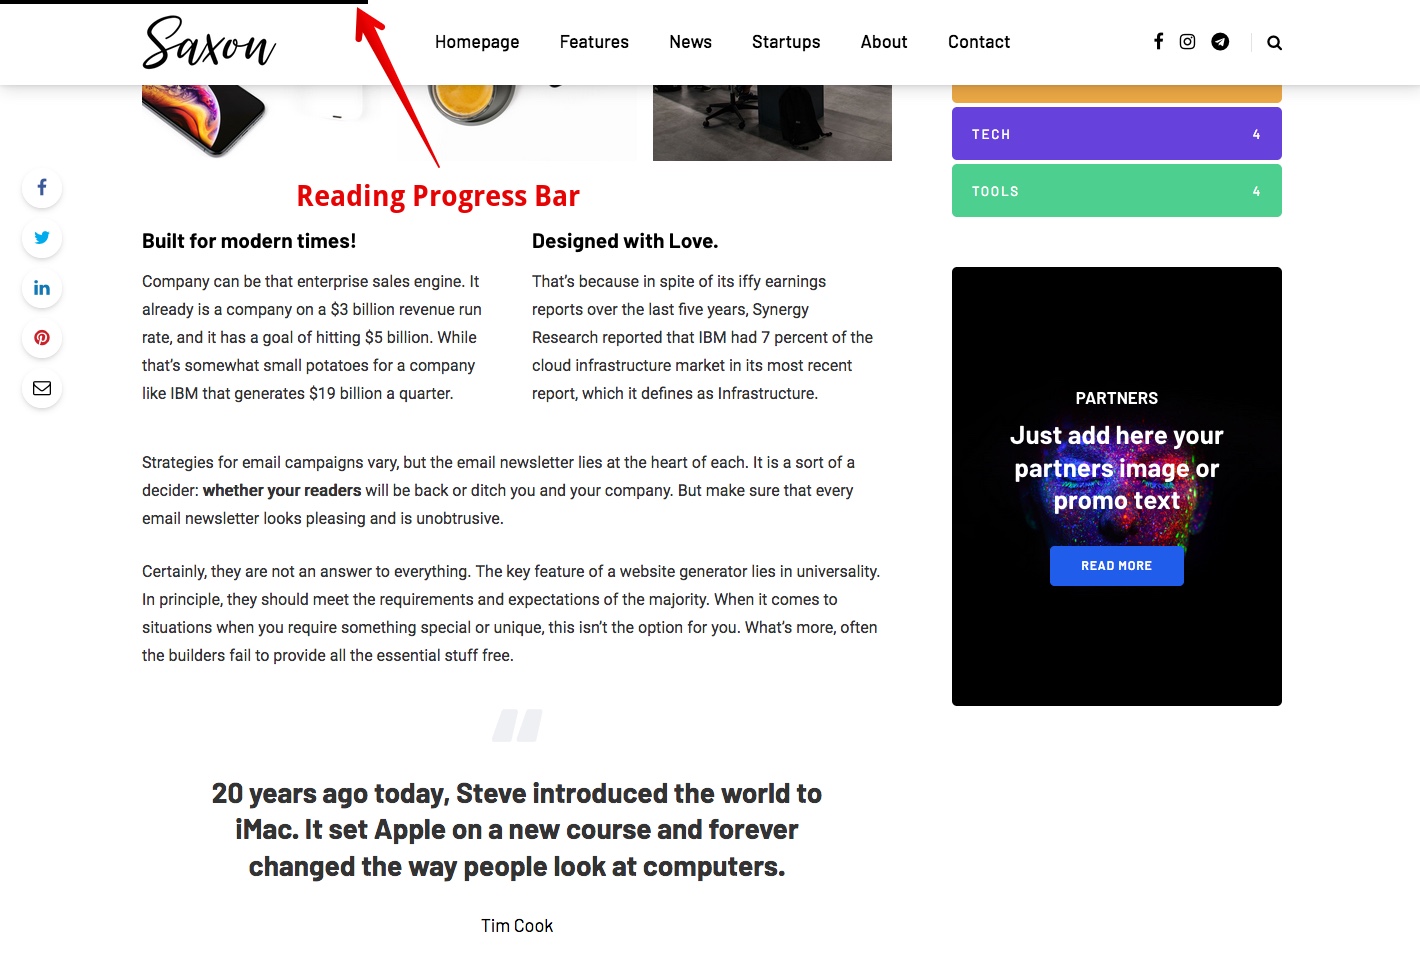
How to use this feature:
- Go to Appearance > Theme settings > Header and enable Sticky header feature.
- Go to Appearance > Theme settings > Blog: Single post and enable Reading progress bar feature.
Featured post (Sticky post)
You can display some of your posts (important posts) always
at first position in blog listing and mark this as featured
post. In different blog styles and layouts this "mark" can
look different.
How to display your post as featured:
- Edit your post in Posts.
- In Publish section check Stick
to the Front Page option. If you use Masonry
layout for your blog you should add Featured
image for this post (because it will be used as
background for featured post).
- Save your post.
Single post small width (side margins)
You can display your posts and pages with side margins for nice look.
To Enable/Disable this feature go to Appearance > Theme Settings > Blog: Single post and enable Small content width option.
This option work for both pages and
posts without sidebars (you can disable sidebar for post and
page in its settings when you edit your post).
Post formats
Our theme support different post formats:
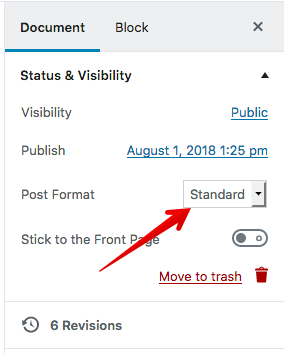
You can select post format when you create post at the right Document > Post Format section.
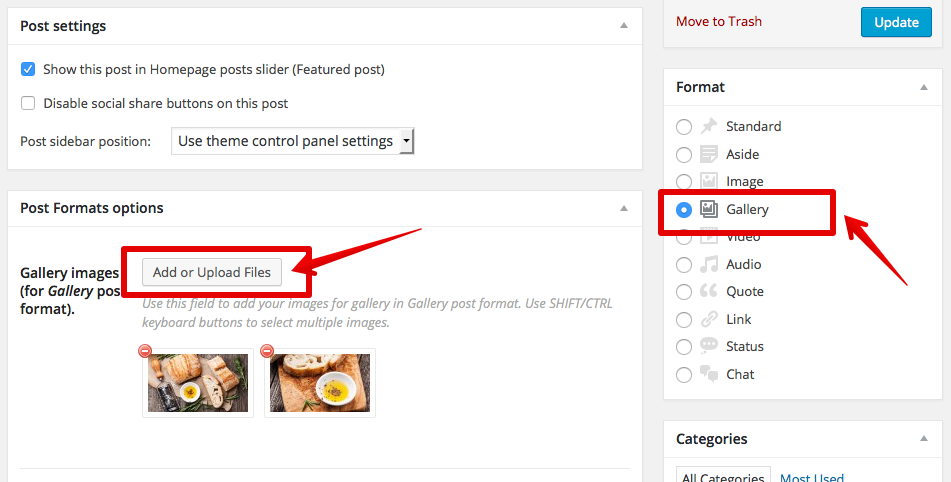
Gallery Post format
- Go to Posts > Add new and create some post (or edit your existing).
- Select Gallery post format at the
right (this is important, otherwise your gallery will not
display).
Click Add or Upload Files button in Post Formats option section for Gallery images:
- Select your photos for gallery (original image size will be used, so crop/resize your photos before uploading it here).
- Save your post. Now it will display your gallery instead of Featured image. On single post page gallery will work as lightbox for all images.
Video Post format
- Go to Posts > Add new and create some post (or edit your existing).
- Select Video post format at the right
(this is important, otherwise your video will not
display).
Add your video url from video service (Vimeo for example, full list of supported video services available here) to Video url field in Post Formats options section for Video post:
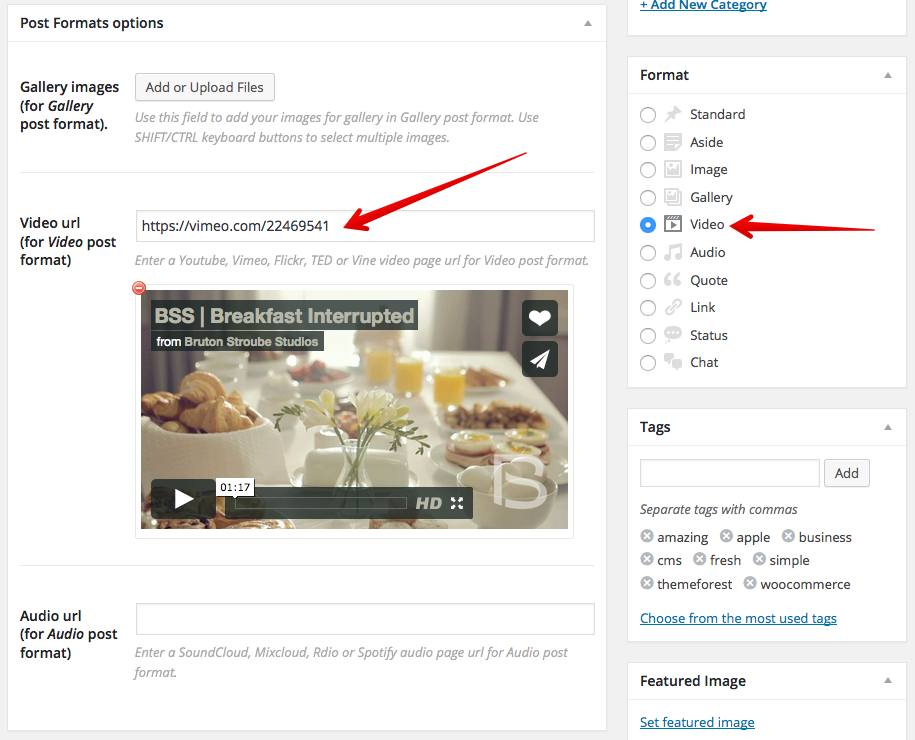
- Save your post. Now it will display your video instead of Featured image.
Audio Post format
- Go to Posts > Add new and create some post (or edit your existing).
- Select Audio post format at the right
(this is important, otherwise your video will not
display).
Add your audio url from audio service (Soundcloud for example, full list of supported audio services available here) to Audio url field in Post Formats options section for Audio post:
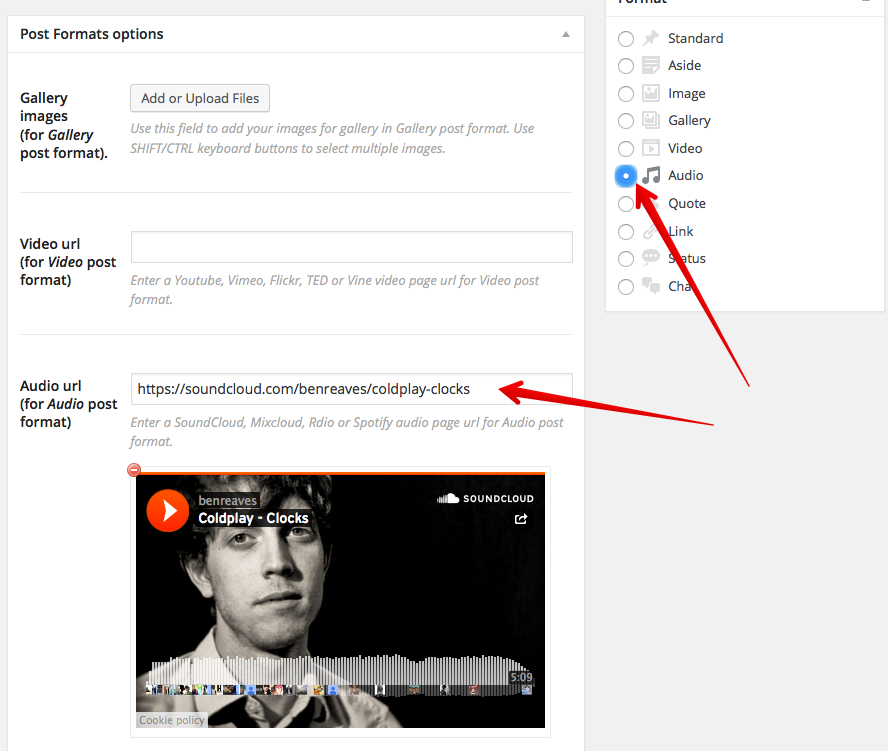
- Save your post. Now it will display your audio instead of Featured image.
Pages management #back
to top
- Go to Pages > Add new.
- Input some page title.
- Add page content.
- You can Input page class if you want to add some CSS styles only for this page.
- Change page settings:

- Don't display this page title (only show page content) - enable if you want to hide page title
- Page sidebar position - you can specify widgets sidebar position for this current page (every page can have different settings here).
- Page header background image
- Publish page.
- Go to Appearance > Menus and add created page to menu.
Using Gutenberg - The New
editing experience#back to top
“Gutenberg” is the codename for the new WordPress editor
focus. The goal of this focus is to create a new post and
page editing experience that makes it easy for anyone to
create rich post layouts. You can read more about this new
Visual WordPress editor and test it here.
Gutenberg Editor is default editor in WordPress 5.0 and later and included with this theme. If you want to continue using old Classic Editor you need to install separate plugin for WordPress 5.0 and later (or disable Gutenberg plugin in Plugins if you use WordPress 4.x).
All demo posts and pages in this theme created using Gutenberg editor in its blocks elements, and may not display correctly without Gutenberg installed.
This theme does not require you to use Gutenberg editor (this is optional plugin provided with theme), you can use Classic Editor or any other your favorite WordPress Page Builder.
We prepared few help articles for you to learn how to use Gutenberg editor in our Help Center article.Coming soon mode#back
to top
You can use Coming Soon feature when you just develop your site, that allow you temporally disable website frontend for regular visitors (they will see your custom Coming soon page), but allow website administrators to see site and work on it.
You can use this plugin to enable coming soon mode on your site:
https://wordpress.org/plugins/coming-soon/Menu management #back
to top
This theme have 3 menu areas. Header and top menus can have different layouts and styles. Header and top menus support multilevel submenus.
Top menu:

Main menu (support Mega Menu settings):

Footer menu:

Menu locations
You need to set what menus where will be display (you don't need to do this if you used One-Click demo data import feature):
- Go to Appearance > Menus.
- Open Manage Locations tab.
- Select/create menu Top Menu for Top
Menu.
Select/create menu Main Menu for Main Menu .
Select/create menu Footer Menu for Footer Menu.

If you don't have menus you need to create it and add your elements. - You can manage menu settings and styles in Appearance
>Theme Settings > Top Menu, Appearance
> Theme Settings > Main Menu and
Appearance > Theme Settings
> Footer.
- Save changes.
Top menu management
Top menu does not support Mega Menu, but you can use special menu CSS classes to add predefined icons to top menu elements and pull some elements to right side of menu.
You can add special classes to CSS Classes field when you add/edit top menu items as shown on screenshot:
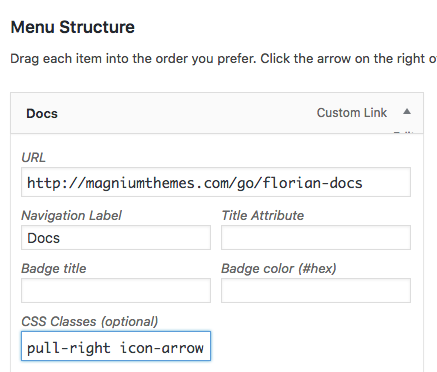
Available CSS classes for use in top menu:
- pull-right - move menu item to the right side of menu (can be used together with other classes, separated by space).
- icon-arrow - add arrow icon to menu element.
- icon-email - add envelope icon to menu element.
- icon-cart - add cart icon to menu element.
Mega Menu management
You can use Mega Menu options for Main menu. Make sure Mega Menu feature enabled in Appearance > Theme settings > Main menu.
You can apply all mega menu settings to root menu items. Children items support only this settings:
- URL
- Navigation Label
- Title attribute
- Badge title
- Badge color
- CSS classes
- Menu item icon
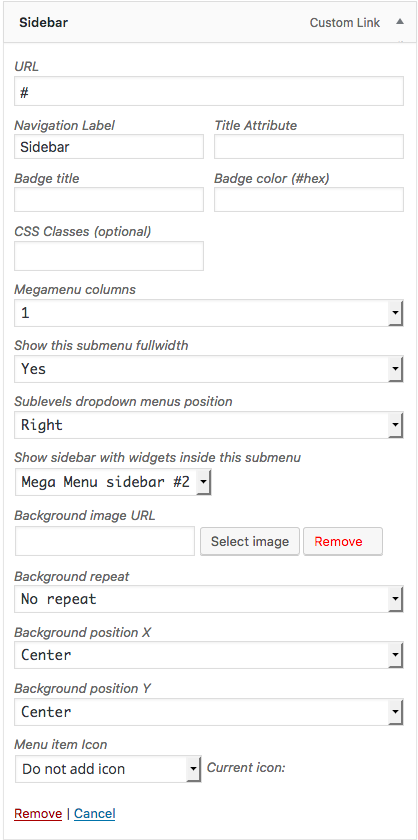
Mega Menu item settings description
- Badge title - use this if you want to add small badge near your menu item (for ex. "Hot!" or "New!").
- Badge color - specify your badge background color (for ex. #000000).
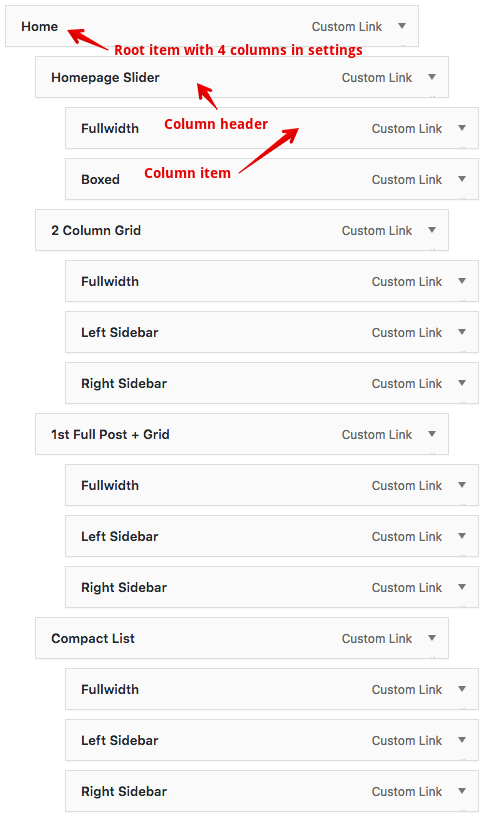
- Megamenu columns - specify number of
columns for dropdown menu that will be expanded from this
item. Every second level item will become column header, and
every third level item will become this column elements.
For example this menu settings and structure allow you to have multicolumn submenu with headers:

- Show this submenu fullwidth - use to have your submenu in fullwidth mode (occupy all header width)
- Sublevels dropdown menu position - use left here if you have your menu item near right side of a screen - this allow you to fix menus that can dropdown to the right out of visible screen area.
- Show sidebar with widgets inside this menu - you can add widgets to Mega Menu Sidebars in Appearance > Widgets, and then use entire sidebar as dropdown item inside root menu. You can select sidebar here and add more sidebars in Appearance > Theme Settings > Main Menu. If you use this option any regular submenu items used here will not be visible and will be replaced by sidebar. Please note that not all widgets that you have may look nice in limited mega menu sidebar space and not all widgets was designed to be here (this is not a bug, this is mega menu restrictions).
- Background settings - you can add image background for your drop down menu item and change its display and position settings inside submenu.
- Menu item icon - you can select Font Awesome 4 icons here to be displayed for menu items. This option works for submenu items too.
Regular widgets will occupy columns in Mega Menu sidebar. Saxon List Posts widget will occupy full row in mega menu sidebar, if you used Fullwidth and 1 column options together:
Widgets management #back
to top
This theme have 6 widgets sidebars where you can add widgets:
- Page Sidebar (Right or Left).
- Posts listing sidebar (Right or Left).
- Single Post sidebar (Right or Left).
- Footer sidebar #1 with 4 columns.
- Footer sidebar #2 with 4 columns (first large column) - this sidebar can be light or dark, depending on Theme Settings.
- WooCommerce sidebar.
After theme installation all WP widgets will be enabled (if you have WP fresh installation) so you need to turn off default widgets that you don't want to see:
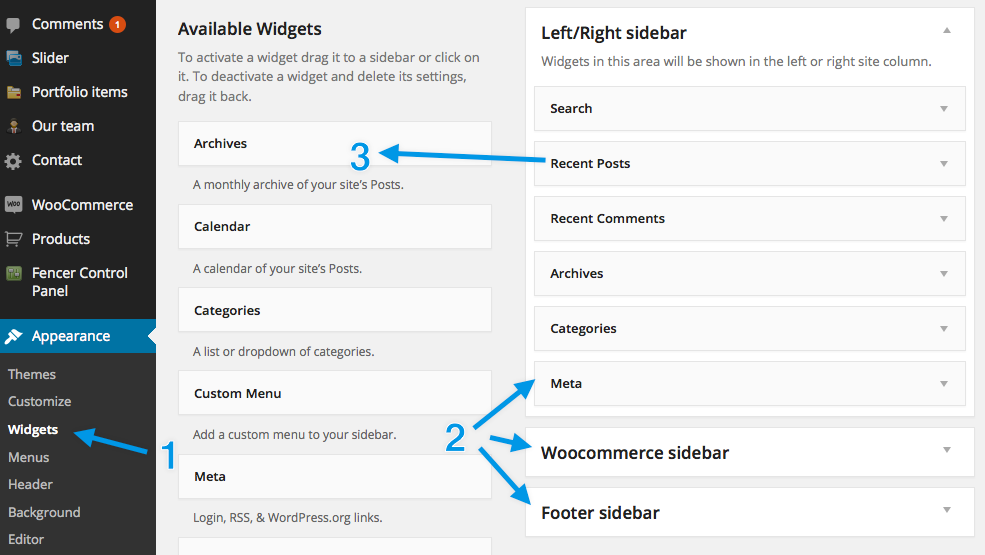
- Go to Appearance > Widgets
- Move widgets from left "Available Widgets" block to right sidebar that you want to use to add it to display in theme
- Move widgets from right sidebars block
to left "Available Widgets" block to remove
it from display in theme
Our theme have 7 special widgets for your blog that improve default WordPress widgets functionality, we recommend you to use this widgets instead of default:
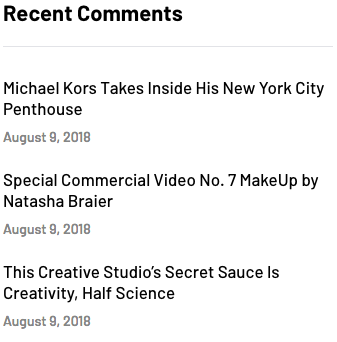
Saxon Recent Comments
Display recent blog comments with date.
Saxon List Posts

Saxon Content
You can use any shortcodes from any plugins in Content Widget, for example to show Mailchimp subscribe form in this widget.
Saxon Social Icons

Also you can show social links from this widget anywhere (in content, theme content areas, etc) using [saxon_social_icons] shortcode.
Saxon Posts Slider Widget
Saxon Categories Widget
Advertisement management #back
to top
Our theme have built-in feature for banners/ads management that allow you to add any banners or other html in different predefined places in theme design.
If you want to add Google Adsense, JavaScript, PHP or other
complex advertisement to theme ads areas or widgets you need
to install
Advanced ADS plugin first. This plugin allow you to
add any type of ads and then use simple shortcode to display
it anywhere (in content, widgets or theme ads areas).
How to use add ads to theme areas:
- Go to Appearance > Theme Settings > Banners management.
- Choose place when you want to show
your banner, enable it and add your
banner HTML/image to this area.
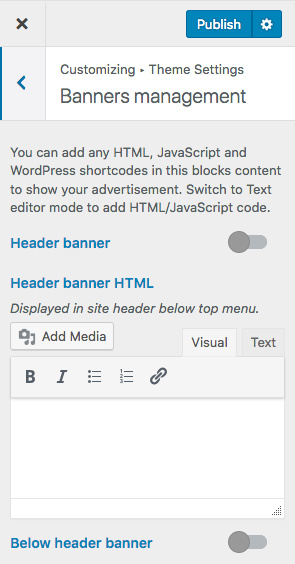
- Add HTML for your banner. If you use Google Adsense or other complex code ads - add this ads shortcode, that you can get after you added your ads to Advanced ADS plugin.
- Click Publish to save Customizer settings.
AMP configuration#back
to top
Our theme allow you to enable AMP format support for your blog content. AMP will not change your site display for regular visitors (if you will not enable automatic redirect to AMP version for mobile users), its allow search engines to show special mobile friendly extremely fast pages and posts from your blog to mobile visitors and prioritize your site in search results. When AMP feature enabled you can see special pages versions by adding /amp/ to the end of your post/page url or your site url.
AMP is an open source framework developed by Google in collaboration with Twitter. Accelerated Mobile Pages create better, faster experiences on the mobile web. At its core, the framework allows you to build lightweight experiences for mobile by simplifying the HTML and following streamlined CSS rules.
All SEO and mobile performance enthusiasts seem to agree that a well-implemented AMP website will:
- Significantly increase the volume of organic search traffic.
- Increase engagement and conversions resulting from faster, better mobile experiences.
- Reduce the load on your servers since AMP CDN caches and responds to most search results.
- Provide an opportunity for your content to be featured prominently in AMP carousel on mobile search results.
How to enable this feature:
- Make sure you installed and activated Accelerated Mobile Pages plugin provided with theme.
- Follow AMP plugin setup wizard for quick configuration.
Select SWIFT design for AMP website when
asked:

- Go to AMP section in WordPress dashboard and configure how you want to display AMP on your website.
- Use Settings and Design tabs in AMP plugin to configure your AMP website display. You does not need to buy PRO plugin version if you don't want to enable additional features. Free plugin version have enough features to add AMP support to your website and get ranking benefits from Google.
- Create new AMP website menus in Appearance > Menus and assign to AMP Menu and AMP Footer Menu areas.
- Now you can view your AMP site version (better to use
real mobile device) by adding /amp/ to
the end of your homepage, category, post or page url. For
example if your site url was http://domain.com/ now you
can check AMP version at http://domain.com/amp/. Your
visitors will see regular site version (even on mobile),
however you can enable AMP version as mobile default
(instead of responsive site version on mobile) in AMP
plugin settings:

- Now you can add your AMP website to your Google Search Console for AMP to improve your site ranking in mobile search results.
Cookies notice (GDPR)#back
to top
You can display cookie notice on your site for your visitors with link to your private policy page. Cookie Consent plugin must be installed to use this feature you can download it here: https://wordpress.org/plugins/uk-cookie-consent/
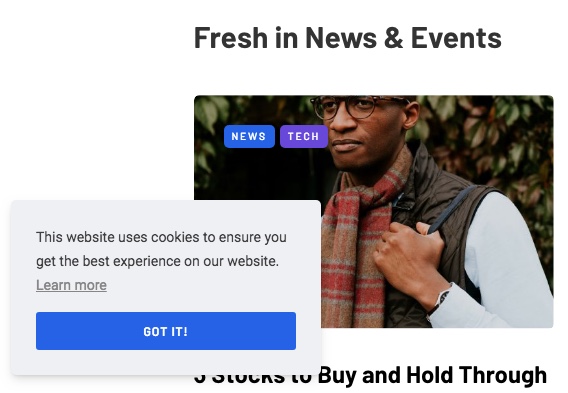
How to use this feature:
- Go to Settings > Cookie Consent.
- Click Content tab.
Set options like shown on screenshot:
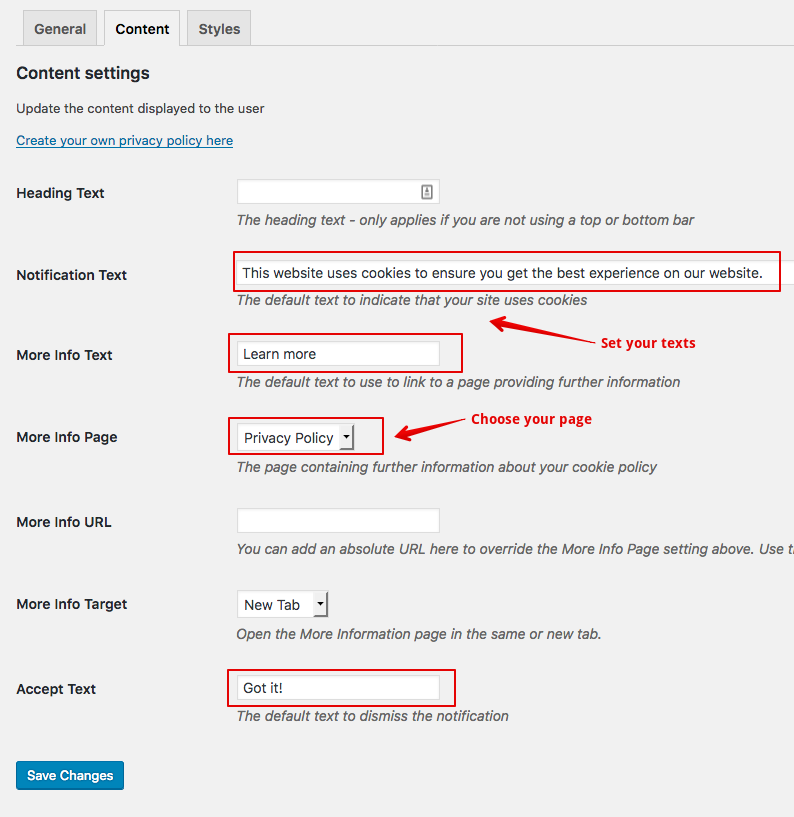
- Save changes.
- Click Styles tab. Set
options like shown on screenshot:
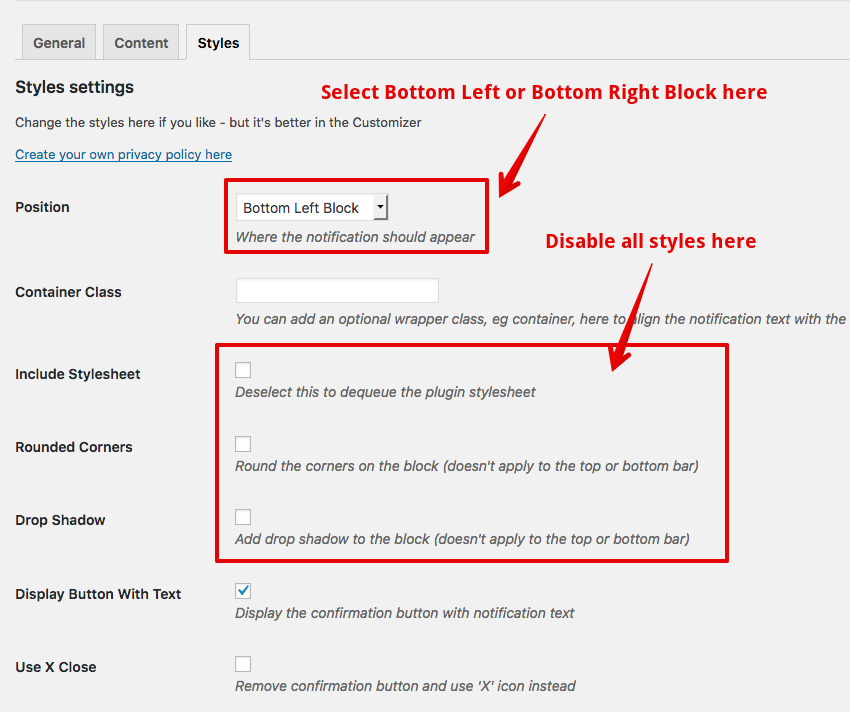
- Save changes.
Additionally we recommend you to install and configure GDPR WordPress plugin:
https://wordpress.org/plugins/gdpr/
Retina support #back
to top
Our theme support retina and responsive images features. Your website will look beautiful and crisp on every device!
To use this features you need to install and configure optional WP Retina 2x plugin:
- Install plugin from official plugin page or Plugins > Add > Search > WP Retina 2x.
- Go to Media > Retina and regenerate responsive images for your site images.
- Go to Meow Apps > Retina and select
Picturefill method for responsive images.
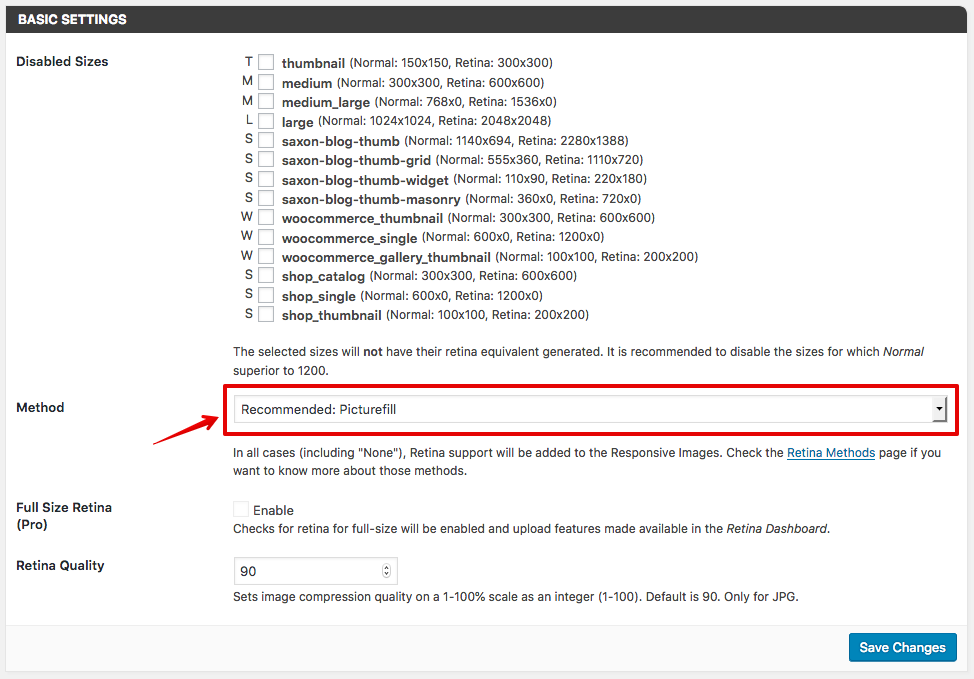
- Save settings.
Shortcodes #back
to top
Our theme include shortcodes that you can use in
posts/pages content, your sidebars inside Saxon Content and
default WordPress Text widget's.
Social icons shortcode
Shortcode will display your social buttons with urls that
you configured in Appearance > Theme Settings
> Social icons.
Usage:
[saxon_social_icons]
Translating theme#back
to top
Manual theme translation
We included POT files for translation with theme:
- /wp-content/themes/saxon/languages/ - main theme translations
Read
this help article about WordPress translations.
Translation with theme translation manager
Read this help article about WordPress translations using Loco Translate plugin.Using WPML plugin for translations
IMPORTANT: Go to WPML -> Languages and scroll down to the Language filtering for AJAX operations section. Check the box to "Store a language cookie to support language filtering for AJAX" and save your settings.
Check WPML Getting Started Guide for complete reference.
Please note that according Themeforest theme license rules you need to buy additional regular theme license for every additional language used on your site (language considered as separate website with another content). For ex. if your site have 3 languages you need to have 3 regular theme licenses at total.
Child theme usage#back
to top
This theme include Child Theme ZIP file. Check our special article how to use it.
Performance and speed#back
to top
Site speed depends on multiple factors and theme itself is just one of this (theme already coded for extra fast work), like WordPress configuration, Server configuration and quality and Content optimization. We included simple guide how to optimize your website for extra fast work with our theme.
Important steps to optimize your website:
- Make sure that you have good hosting/server (we recommend to use Bluehost to host WordPress themes). You will never get good score on cheap shared hosting. If you see in Google Page speed warnings about large "Service response time" - this means your hosting performance is very bad and hosting have slow connection speed.
- Install W3TotalCache plugin and correctly configure it (enable all caches and configure it correctly).
- Prepare your post images (resize and compress) before you upload it to WordPress (use images like 1200x800px JPG with 80% quality. Never upload original images from your camera in high resolutions like 4000x3000px).
- After you resized your images compress it with lossless images compression utilities - . Only after this you can upload your images to WordPress. You can use this software: ImageOptim (MacOS) or Caesium (Windows). You need to properly configure this software (not just process images with default settings) for good results.
- Use less third party widgets and elements that connects to external services (Facebook widgets, Instagram widgets, etc).
- Enable browser caching and cache expiration dates on server for static files (you can ask hosting support how to do this on your server).
- Disable all third-party plugins that you does not use to speed-up your website if your hosting is not very fast.
- Use third party services that optimize your server response time and cache, like CloudFlare.
- Check this official WordPress Optimization guide article and external article links in it.
If you still get bad score you can contact our support to get suggestions why your site have low score.
If you need help with site speed and score optimization you can order our special service with 20% discount because you purchased this theme:
Order Premium WordPress Website Google Page Speed and SEO Optimization service on Envato Studio.Update theme#back
to top
This theme include recommended Envato
Market plugin. This plugin helps customers receive
updates to their premium Themes & Plugins purchased
through Envato Market (ThemeForest & CodeCanyon).
You can configure this plugin in Envato market
section in WordPress dashboard to receive automatic theme
updates.

You can see theme release notes with all versions and changes in Themeforest theme description page and in full theme ZIP archive from Themeforest ("All files & Documentaiton" large ZIP file).
Always backup your website before updating theme or plugins!
Read this article - How
to update WordPress theme
Manual theme update
- Download latest theme archive from Themeforest (FULL theme archive with documentation, not just theme installation file).
- Unpack archive and open Documentation/release-history.html file in your browser for view (not for Edit).
- Follow instructions in file to update your theme.
Automatic theme and plugin updates
If you newbie you can use this plugin for easy plugin and theme updates:
We don't provide any support for any issues that you can get from this plugin and does not test our updates with this plugin. We recommend you to use manual theme update.
Support#back
to top
If you have support questions about this theme you should:
- Check WordPress section in our FAQ page.
- If you don't find answer submit support question in our support system.
- If you need customization service or WP/Theme setup - contact us.